Whether you’re a podcaster or a musician, speeding up audio files can be extremely useful sometimes. Maybe you want to listen to lectures faster, shorten the length of a song, or edit a podcast more efficiently. Whatever your reason, this guide will walk you through the best ways to speed up audio files without losing quality.
Speed Up Audio File with MiniTool MovieMaker
MiniTool MovieMaker is an easy-to-use video editor designed for beginners to create videos from images in just a few clicks, and provides multiple editing tools and plenty of effects to turn your footage into amazing content. Additionally, it also functions as a simple audio editor that allows you to trim, split, and merge audio files, change the audio speed, apply fade-in and fade-out effects, adjust the volume, and extract audio from video.
Here’s how to speed up an audio file with MiniTool MovieMaker.
Step 1. Click the button below to download the software on your PC.
MiniTool MovieMakerClick to Download100%Clean & Safe
Step 2. After installation, open the application and click the New Project button to enter the main user interface. Under the Media tab, click the Import Media Files button to locate your audio file (such as MP3, WAV, FLAC, M4A, AAC, AAC, APE, M4R), and add it to the media library.
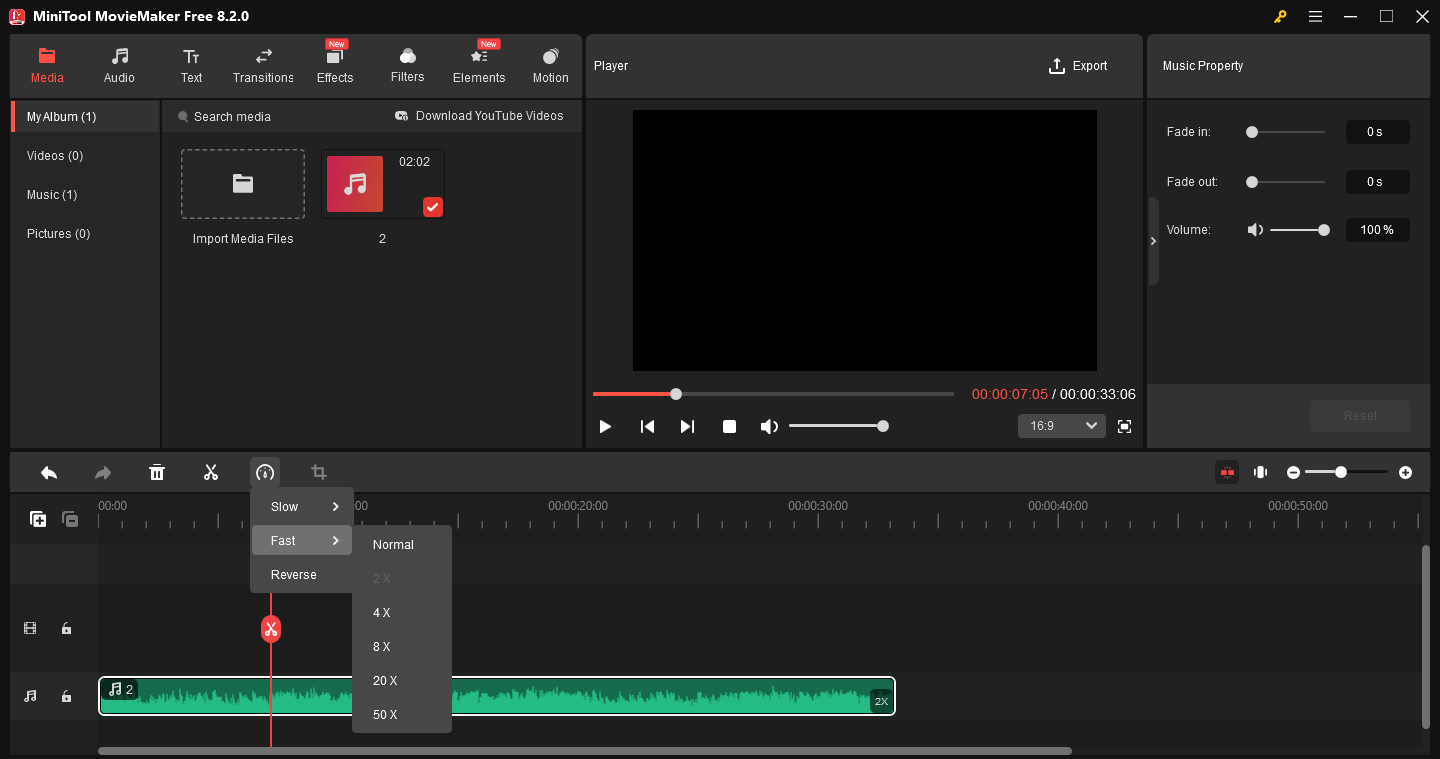
Step 3. Drag the audio file to the timeline and select it. Click the Speed icon on the timeline toolbar, select Fast, and choose a speed. Play the audio, and try another speed if you’re not satisfied.
Step 4. Continue editing your audio file.
In the Music Property section, you can drag sliders or enter target numbers to fade the audio in and out or change the volume.
To trim the audio, hover your mouse over either end of the clip until the Trim icon appears, and drag the icon inwards.
To split the audio, drag the playhead to the desired place and click the Split icon. Repeat this step to divide the audio into multiple segments and delete the one you don’t want.
Step 5. Click the Export button in the upper right corner. Next, open the Format drop-down list and choose MP3. Select a location to save the file and click Export.
Speed Up Audio File with Audacity
Audacity is a free audio editor and recording application that provides a wide range of features for editing, recording, and analyzing audio. Besides, it offers various effects to enhance your audio, such as noise reduction, vocal reduction, pitch adjustment, tempo adjustment, and more.
Follow the steps below to speed up an audio file using Audacity.
Step 1. Launch Audacity after installing it on your PC.
Step 2. Click File > Open to open your audio file. Do one of the following to speed up the audio clip.
#1. Hold the Alt key and hover the edge of the clip until a clock cursor appears. Then, drag the edge inwards. Alternatively, right-click the clip, select Change Speed, and type a number in the dialog to change the audio speed while preserving the pitch.
#2. To speed up the audio and change the pitch at the same time, go to Effect > Pitch and Tempo and Change Speed and Pitch, and increase the value of Speed Multiplier and Percent Change.
#3. To speed up your entire project over time, go to Tracks > Add New > Time Track, and click and drag the blue line upwards. Repeat this step to adjust the playback speed dynamically.
Step 3. Export your audio from Audacity.

Speed Up Audio File with MP3 Cutter
MP3 Cutter by 123Apps is a simple online audio editor that allows you to trim or cut clips, change the volume, adjust the speed, shift pitch, etc. So, if you want to speed up audio files online, MP3 Cutter is a good option.
Visit the website and import your audio file. Click Speed at the top, and drag the speed slider to the right. Next, select the output format and click Save.

Conclusion
Speeding up audio files is a simple yet useful way to save time and enhance productivity. Whether you use free tools like MiniTool MovieMaker or professional software like Audacity, the process is quick and easy. Try different speeds to find what works best for your needs.
About The Author

Position: Columnist
Cora is a tech writer specializing in digital media workflows, with over six years of hands-on experience in video post-production, media transcoding, and screen capture. Her writing is always clear and practical. Cora also produces in-depth software reviews for users across skill levels to help them find the right tool and enjoy video editing.
User Comments :