Sometimes all you have to do to turn a dull image into something more atmospheric is add some rays of light or adjust the light source. Luckily, it's not too tough to do this in Photoshop using several light effect filters. If you're not sure how to do it, you've come to the right Photoshop tutorial on MiniTool MovieMaker! I'll show you how to add lighting effects in Photoshop to take your images to the next level.
6 Steps for Adding Lighting Effects in Photoshop
Step 1. Open the Photo
Open the photo you want to add a lighting effect to by going to the top menu bar and selecting File > Open.
From your computer locate and choose the photo.
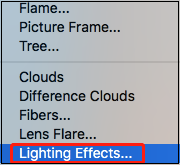
Step 2. Open Lighting Effects
Once your photo is open, navigate to the top menu bar and select Filter > Render. In the drop-down menu, click Lighting Effects.
When Lighting Effects is clicked, the Properties Panel of the Lighting Effects Filter will appear. This lets you choose customized settings for your lighting effects.
A preview window will appear giving you a preview of the lighting effects filter modifications.
![How to Change Background Color in Photoshop [Step-by-Step Guide]](https://images.minitool.com/moviemaker.minitool.com/images/uploads/2023/09/how-to-change-background-color-in-photoshop-thumbnail.jpg)
Step 3. Options Bar
The Lighting Effects Options Bar will appear above the canvas window.
In the Lightening Effects Filter Options Bar, you can click on a Preset.
Choose from 17 Light Effects Presets or leave it as the default Custom option.
When you select a Preset, like Five Lights Up shown in the photo below, the preset of light sources you’ve chosen will come up.
In this case, 5 spotlights pointing upwards show up in the photo. Here, you can tweak and adapt the preset.
Presets can be useful as a spot to begin editing, or sometimes they click the lighting spot exactly.
Step 4. Light Source
Next to the preset option is an option called Lights that lets you select your lighting source.
Click the torch icon for Spot Light, the light bulb icon for Point of Light, as well as the sun icon for Infinite Light.
When you click on an icon, a light source will be produced and a Light Layer will be produced in the Lights Panel beneath the Properties Panel.
Activate a Light Layer in the Lights Panel when you want to change or delete it.
When a lighting source is activated a bounding ellipse will be produced over your photo in the Preview Window.
The light source will be included inside this bounding ellipse.
This ellipse can be extended or retracted by dragging the edges with your cursor.
Rotate the ellipse by dragging your cursor around the edges.

Step 5. Properties Panel
The Properties Panel provides choices for customizing the Lightening Effect Filter.
Let’s have a look at the options.
In the first bar, you can select between Point, Spot, and Infinite as the light source.
Color
Click on the color box and a Color Picker dialog box will appear.
Use this to adjust the light source color.
Hotspot
Slide the slider to adjust the size of the Hotspot.
Colorize
This option lets you add a tint to the overall lighting.
Exposure
Slide the slider to increase the exposure and change the highlight and shadow detail.
Gloss
Slide the slider to the left/right to increase or decrease how much the surface reflects light.
Metallic
Use this option to decide which is more reflective – the light or the object on which the light is cast.
Ambiance
Use this when you wish to diffuse the light. This makes it appear as if there were another light source in the room.
Texture
Will apply a Texture Channel.
Step 6. Create Lighting
Now you have all the information you have to try and create a new light source or lighting effects on your photos.
Go crazy and have a great time.
Click OK when you’ve completed and saved your document.

When the Photoshop Lighting Effects Filter Doesn’t Work
The most common reason that Lighting Effects do not work in Photoshop is that the Use Graphics Processor option is not selected in the Photoshop Preferences.
The other cause is that your graphics card driver is out of current.
The best spot to start is by checking your Photoshop Preferences.
Go to Photoshop in the upper left corner of your menu bar.
In the drop-down menu beneath Photoshop click Preferences > Performance.
In the Dialog box that appears check that the Use Graphics Processor option is selected.
MiniTool MovieMakerClick to Download100%Clean & Safe
Conclusion
The above is a step-by-step guide on how to apply Photoshop lighting effects and some reasons why lighting effects do not work in Photoshop.
User Comments :