Want a Movavi blur face tutorial? Movavi allows you to easily protect privacy or generate artistic effects in your projects. You can seamlessly apply blurs to faces in a couple of clicks, ensuring your content complies with privacy standards.
Make video editing accessible to everyone with the software’s intuitive interface and advanced features. Find out how Movavi can help you improve your video editing skills and explore the wide range of features it offers.
Movavi Video Editor Blur Face
Movavi is a multi-functional video editing app that provides a variety of easy-to-use features, ideal for both novices and pros. Its intuitive design enables you to edit videos with ease, including applying effects, transitions, etc.
One outstanding feature is the ability to blur faces, which ensures privacy while also improving creative expression. Are you prepared to dive in? Now let’s look at the Movavi blur face tutorial.
Step 1. Add video to Movavi
After you open Movavi, click the Add Files button to import a local video that requires face blurring.
Step 2. Drag and drop the video to the timeline
After you import the video, drag and drop the video to the timeline.
Step 3. Add and set face blur
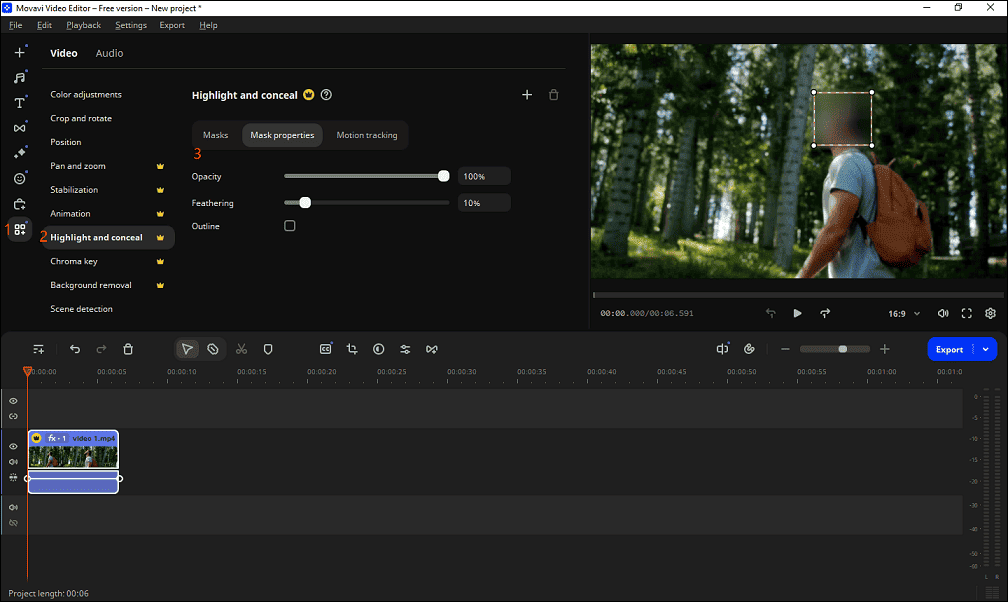
There is a More tools tab in the toolbar on the left side of the interface. Select it and click on the Highlight and conceal sub-tab.
Then, you will see the Masks module, where you can pick a mosaic effect you prefer. After choosing, you will find that any face in the video has been blurred, as well as you can change the size of the blurred area manually.
Next, you can go to the Mask properties module to change the opacity, feathering, etc.
You can also click the Motion tracking module if you would like the mosaic to follow the face’s movement in the video continuously. It is recommended that the AI option is in use.

Step 4. Preview the applied effect
After carrying out the above operations, the mosaic effect will appear continuously on any face in the video. You can export the video as soon as you confirm the effect.
MiniTool MovieMaker – Another Great Way to Blur Face in Video
While Movavi provides amazing face-blurring capabilities, MiniTool MovieMaker is another wonderful alternative to consider. It is one of the most reliable apps you will find for editing and enhancing your videos.
It also includes a user-friendly interface and powerful editing tools that can assist you in creating videos from scratch effectively. Moreover, it supports fast rendering speed, so you can see your final results in just a few minutes.
MiniTool MovieMakerClick to Download100%Clean & Safe
To blur the face in the video with MiniTool MovieMaker, follow the steps presented below:
Step 1: Download, install, and launch the MiniTool MovieMaker app on your computer.
Step 2: After launching, close the promotion window to enter the main user interface.
Step 3: Click the Import Media Files button to import a local video that needs face blurring.
Step 4: Drag and drop or click the + icon to add the imported video to the timeline.
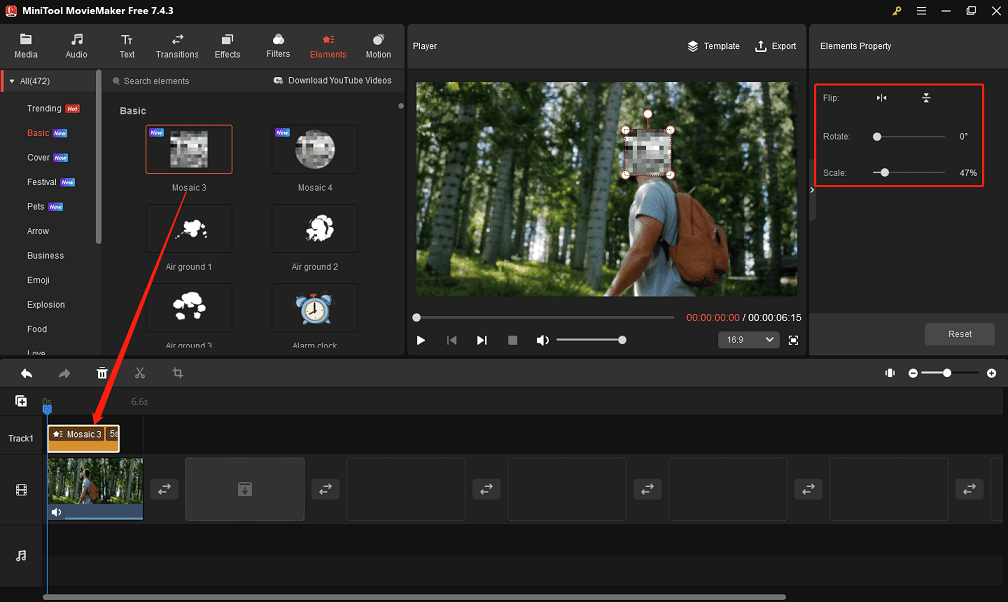
Step 5: Go to the Elements tab at the top and select the Basic sub-tab on the left side, where you will find the mosaic effect. Or you can find this effect by typing “mosaic” in the search bar in the top left corner.
Step 6: Click the Download icon on the blur face effect you need to use. Once you have it, click the + icon on it to add it to the timeline.
Step 7: In the Player section, you can change the size and position of the mosaic effect to make the face in the video appear blurred. Additionally, you can go to Elements Property to further edit the effect, such as flipping or rotating.

Step 8: When you’ve previewed and are satisfied with your edits, click Export at the top right to make some output settings and then save the video to your computer.
Conclusion
This is the Movavi blur face tutorial we provide, effectively solving privacy and creative needs. We hope this helps.


User Comments :