iMovie is a video editing program available for free on all Mac and iOS devices. It allows you to create stunning videos with various features, effects, soundtracks, etc. One of the features you can apply to your video clips is reversing them, which means playing them backward. Here’s how to reverse a video on iMovie on Mac and iPhone/iPad.
How to Reverse a Video on iMovie on Mac
If you’re using iMovie on your Mac, reversing a video clip is very easy. Here are the steps you need to follow:
Step 1. Open iMovie and import the video clip you want to reverse into your project.
Step 2. Drag the video clip onto the timeline and select it.
Step 3. Click on the Speed button above the viewer, which looks like a speedometer icon.
Step 4. You’ll see the Reverse option under the tab and select the checkbox next to it.
Step 5. A reverse-play icon appears on the clip in the timeline. Now, you can play the video clip backward in iMovie.
Step 6. Preview the result and make any other edits you want, like trimming, cropping, splitting, rotating, etc.
Step 7. When you’re happy with your reversed video, you can export it by clicking on the Share button in the toolbar. You can choose to save it to your Mac, upload it to YouTube, or send it to another device.
How to Reverse a Video on iMovie on iPhone/iPad
Unfortunately, iMovie doesn’t offer the reverse feature to help you play a video backward on iPhone/iPad. Unless you use a third-party app to reverse your video and then import it to iMovie for further editing. Here’s how to reverse a video on iMovie on iPhone/iPad:
Step 1. Download and open a popular app called Reverse Cam on your iPhone or iPad.
Step 2. Choose to record a new video or select one from your library.
Step 3. After you select or record your video, you’ll be asked to choose playback speed.
Step 4. Wait for the app to process your video and reverse it.
Then, you can get the reversed video on iPhone/iPad. After you get the video, you can import the video to iMovie, and then edit your reversed video on iMovie as you normally would.
Best iMovie Alternative to Reverse Video for Windows Users
If you’re on Windows, consider using MiniTool MovieMaker. It’s an excellent alternative to iMovie and allows you to reverse videos quickly and easily. Furthermore, as a versatile video editor, it also enables you to trim, crop, split, flip, rotate video, apply 3D LUT effects to videos, add music, transitions, filters, text, stickers, and more.
Here is a tutorial on how to reverse a video using an iMovie alternative:
Step 1. Download and install MiniTool MovieMaker on your Windows PC.
MiniTool MovieMakerClick to Download100%Clean & Safe
Step 2. Launch it and enter its main interface.
Step 3. Click on the Import Media Files area to import the video you’d like to reverse and drag it onto the timeline.
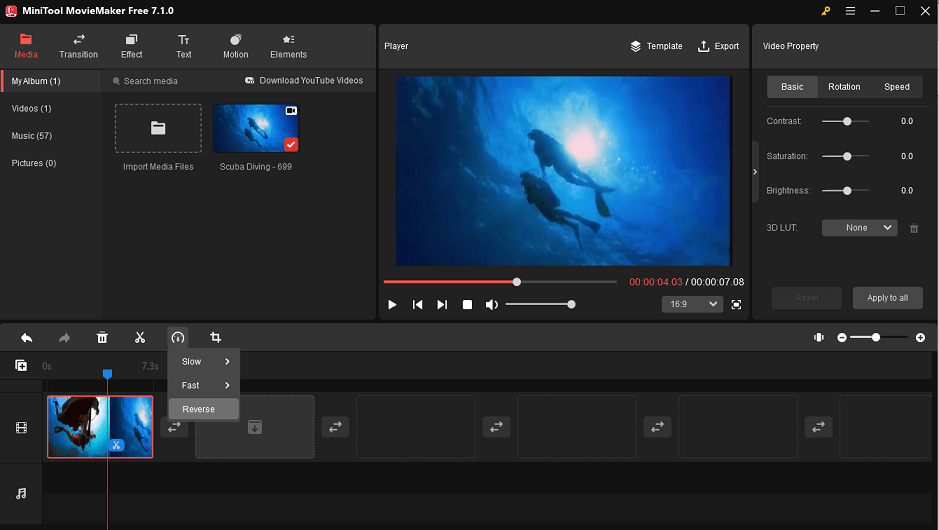
Step 4. Highlight the video on the timeline, click the Speed icon, and choose Reverse.

Step 5. The video will now play backwards and you can also make other edits to the video.
Step 6. Once done, click on Export to save the reversed video to your PC.
Bottom Line
Reversing videos can be effective in video editing when you want to create a rewind effect or simply want to add a bit of fun to your video. We’ve shown you how to reverse a video on iMovie on Mac/iPhone/iPad. Hope it will be helpful!


User Comments :