How to fade audio in Audacity? With Audacity fade effects, you can add professional fades to audio files with ease. To produce an engaging, deeper podcast, it can be helpful to know how to fade in Audacity so that it plays in the background while still allowing the spoken word track to be easily heard. There are several ways to do that. Get to know now!
MiniTool MovieMakerClick to Download100%Clean & Safe
How to Fade Music in Audacity?
Option 1. Linear Fades
The simplest method to make a fade in Audacity is to make use of the classic Fade In / Fade Out effect.
Linear fades are another name for these basic fades. They apply constant velocity and amplification throughout the chosen part of the audio.
The amplitude of the audio changes from 0 to full volume or from full volume back to 0 in these fades.
To apply this fade effect, grab the Selection tool, which resembles a cursor. Select the desired audio segment and go to Effect > Fade Out.
Applying the effect creates a Linear Fade that starts at 0 and will amplify the level to full volume throughout one second.
If you desire the fade to more gradually come, you can make the audio selection longer or make the length of the fade shorter by selecting a smaller section.
To divide a track into multiple sections so you may apply a fade to an individual portion of audio, press Ctrl + I or Cmd + I.
Option 2. Crossfade
When applying this effect, you have two choices: Crossfade clips and Crossfade tracks. The former makes it simpler to switch between two different clips, while the latter helps in crossfading between two audio tracks as well as are more precise.
Place your two clips next to one another using the Time Shift tool to add a crossfade between them on the same track.
Select the area you want to crossfade with the Selection tool and then go to Effect > Crossfade Clips to combine the sounds you’ve selected.
Using the Selection tool, organize the clips so that a crossfade will be added between two clips on distinct tracks. Click Effect > Crossfade Songs, put the cursor where you need the fade to start, and then drag it between the tracks you want to blend.
Option 3. Studio Fade Out
The effect is displayed by Audacity as a curve that looks like the letter S. It leads to a fairly gentle fading. There is complete silence after the first boom. It is a sound that actually seems to fade away over time. You can repeat the fading option quickly by utilizing the repeat last effect. Alternatively, you can use Ctrl + R to do the same.
Select the audio segment, click the Effect menu, scroll to the bottom, and hit Studio Fade Out to apply this effect.
Option 4. Adjustable Fade
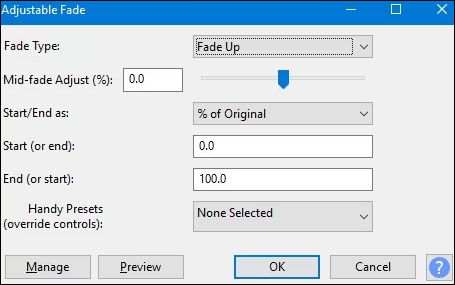
When you select the customizable fade option, a dialog box will appear on the screen. You can use that dialog box to customize the form and pattern of the fading. If you want, you can also use this ability to create partial fades. It’s important to keep the tracks stacked one on top of the other, with the lower below the higher one as well as its end overlapping, while using this form of fade.

To employ the fade option, click Effect from the menu and select the variable fading feature.
Conclusion
Audacity offers a set of tools and services for fading audio. To give your listeners the perfect listening experience, you can learn any one or more of the above four ways of how to fade music in Audacity as needed.


User Comments :