I love listening to ASMR sounds like raindrops or ocean waves, which helps me relax. While enjoying these soothing sounds, I started wondering how to add underwater effect to audio to make my own recordings feel immersive and unique. After some searching and experimenting, I discovered three practical ways to create this effect using Audacity, Melobytes, and Elysia Tools.
Key Techniques for Creating Underwater Audio
To make audio sound like it’s underwater, there are several techniques commonly used by audio editors:
- Low-Pass Filter (LPF): Reduces high-frequency content, leaving a deeper, muffled tone that gives the impression of being submerged.
- EQ Adjustments: Cutting high frequencies and slightly boosting low-mids helps simulate how sound travels through water.
- Reverb: Applying a subtle or unusual reverb can replicate the reflections and resonance of an underwater environment.
- Automation: Gradually transitioning from normal to filtered audio can mimic the effect of diving into water.
These techniques form the foundation of the underwater sound effect and can be applied in most audio editing software. Next, I’ll walk through three practical ways to add an underwater effect to audio, using Audacity, Melobytes, and Elysia Tools as examples.
How to Add Underwater Effect to Audio
Method 1: Use Audacity
Audacity is one of my go-to tools when I want to add an underwater effect to audio because it’s free, versatile, and available on multiple platforms. It provides low-pass filter tools and a reverb effect to make the audio sound as if it is underwater. In addition to creating underwater audio effects, Audacity can also add other effects, such as echo or looping, to meet a variety of audio editing needs.
Below is a step-by-step guide on how to add underwater effect to audio using Audacity.
Step 1: Open the Audio File in Audacity
Download Audacity from the official website and launch it. Then click File > Open to select the audio file from the computer.
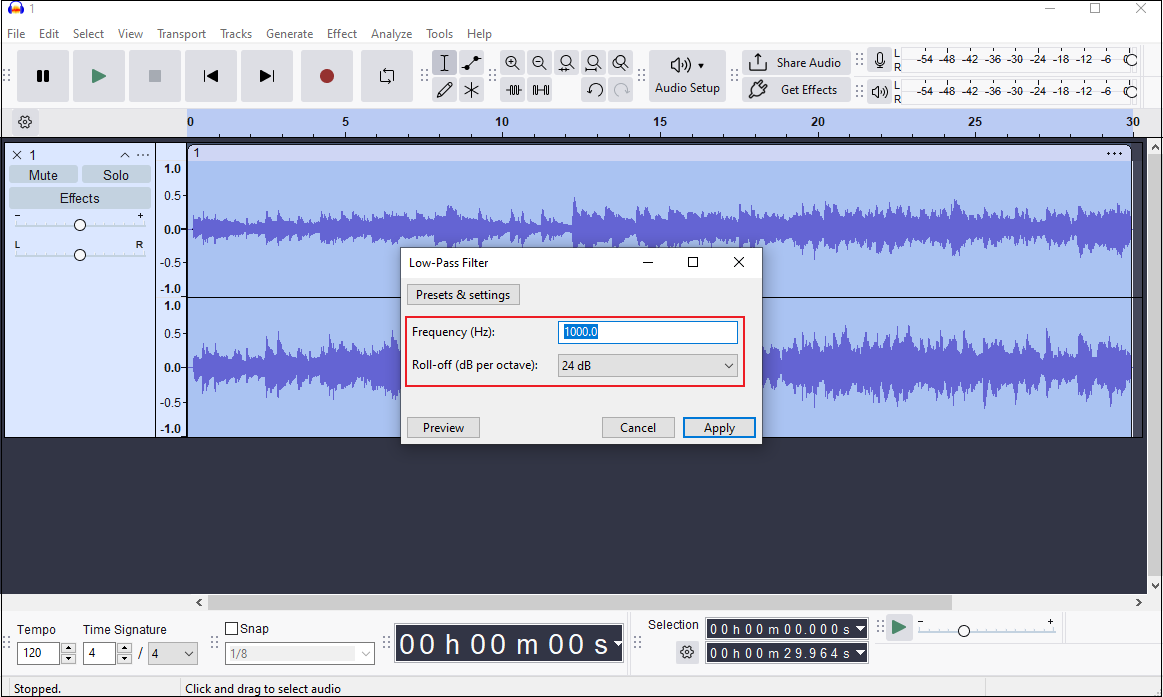
Step 2: Apply a Low-Pass Filter
Drag the cursor to select the portion of the audio want to edit, or double-click the track to select the entire audio. Next, go to Effect > EQ and Filters > Low-Pass Filter. It is recommended to set the Frequency between 750 Hz and 1500 Hz, and the Roll-off to 24 dB or 36 dB. Then, click Apply to save the changes.
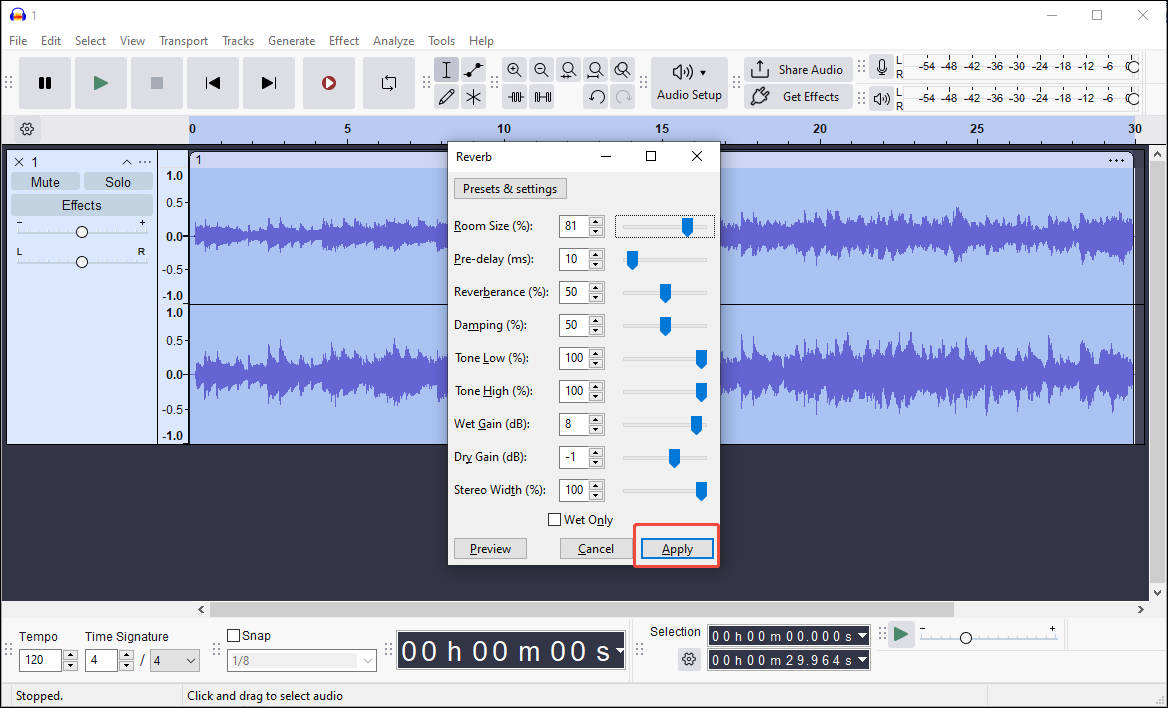
Step 3: Add Reverb
Go to Effect > Delay and Reverb > Reverb. To simulate an underwater environment, it’s suggested to use a high Room Size and Wet Gain, which can create a small, wet-sounding room effect. Click Apply to save the settings.
Step 4: Save the Edited Audio
Click File > Export Audio. Choose the location on the computer to save the file, then customize the file name, format, sample rate, and encoding settings. Finally, click Export to save the edited audio.
Method 2: Use Melobytes
Melobytes is an online tool I sometimes use when I want to quickly add an underwater effect to audio. It’s a one-click tool that is convenient and has no complex settings, making it ideal for users who want fast results. Without requiring a login or installation, it allows me to experiment with different effects directly in my browser.
Here’s how I typically use Melobytes to create an underwater sound.
Step 1: Upload the Audio
Go to the Melobytes website for the underwater sound effect and click the Upload icon to import the audio file.
Step 2: Apply the Underwater Effect
After uploading, click Execute to apply the underwater effect to the audio.

Step 3: Download the Processed Audio
Once the processing is complete, click Download generated file to save the edited audio to the computer.
Method 3: Use Elysia Tools
Elysia Tools is another option I use when I want to add an underwater effect to audio. Compared with Melobytes, it provides more control over audio settings, making it suitable for users who want to fine-tune the effect. Follow the steps below to get started.
Step 1: Upload the Audio
Navigate to the dedicated underwater audio effect page on Elysia Tools and drag the audio file into the upload section.
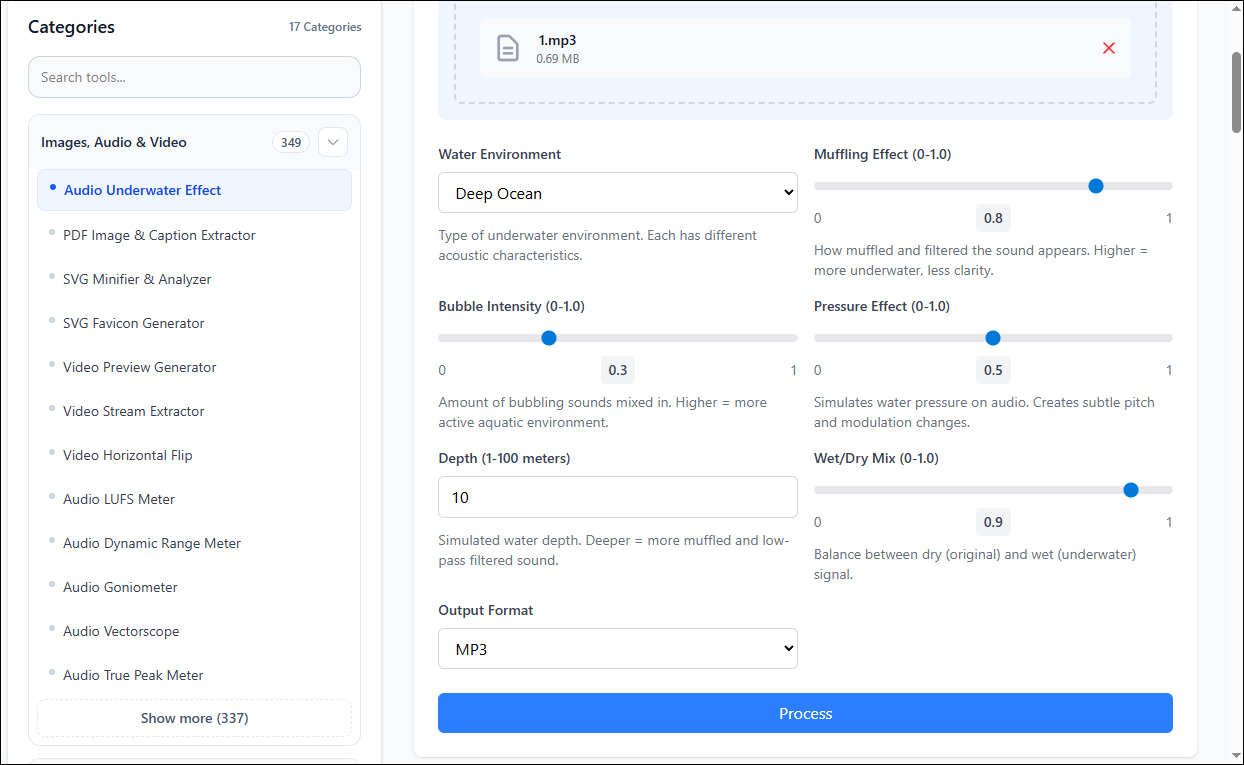
Step 2: Adjust the Underwater Settings
Elysia Tools offers a variety of settings to simulate different underwater environments, including deep ocean, shallow water, swimming pool, ocean surface, and underwater curve. I can also use sliders to adjust the muffling effect, bubble intensity, pressure effect, and wet mix, providing a desired underwater sound.
Step 3: Download the Processed Audio
After adjusting the settings, click Process to apply the effect. Once the conversion is complete, click Download File to save the edited audio to the computer.
Conclusion
This post explores how to add underwater effect to audio using Audacity, Melobytes, and Elysia Tools. Choose the one that fits your taste and start right now.
About The Author

Position: Columnist
Alice is a tech writer at MiniTool, specializing in tutorials and guides on video editing and screen recording. She stays up to date with the latest tools and techniques to ensure her content is accurate and easy to follow. By combining hands-on testing with continuous learning, Alice aims to help readers solve tech problems efficiently.
User Comments :