Nowadays, nostalgia for the 1990s seems to be fashionable. VHS effects are one of the most popular, as seen in Internet pictures and mobile apps. If you understand how to create VHS effects, you can make vintage-style videos to join the trend.
Luckily, you do not have to reshoot your video with an analog camera and transfer the film to a VCR video format to get the effect of an old recording. It is comprised of a couple of similar layers with slightly different Effects, as well as a cool overlay layer to give it the tubular, radical ’90s vibe.
In this guide, we will basically walk you through how to add VHS effects in Final Cut Pro X. Read on.
How to Do VHS Effect with FCPX?
If you would like to know how you can create the Final Cut Pro VHS effect without any plugins, follow the steps below:
Start Final Cut Pro and click New Project.
In the Project Name section, name your project as VHS effect. Adjust its Format to NTSC SD and Frame Rate to 29.97p, then click the OK button.
Drag and drop the footage into the timeline. Next, scale your project to fit the frame.
Open the Effects and enter Add Noise in the search bar. Choose the Add Noise effect and put it on the footage.
Go to Blend Mode and choose Color Dodge. At this point, click Type and choose Gaussian Noise (Film Grain). Add the amount between 0.23 to 0.32 in the Amount section.
Now return to the search bar and enter Gaussian Blur. Select that and drag and drop it to the footage in Final Cut Pro X.

In the Gaussian settings, adjust the amount to approximately 2.0 to 3.0.
Return to the search bar and enter Sharpen. Choose the Sharpen effect and drop and drop it onto the footage.
Adjust the amount of sharpness to about 8.0 to 9.0.
Right now, type the Bad TV effect into the search bar. Select it and put it on the footage in FCPX.
Adjust the amount of the effect to approximately 8.0 to 9.0. Choose Gaussian Noise (Film Grain) in the Static Type option. Choose Soft Light in the Static Blend mode option.
Go back to the search bar and enter Prism. Select the Prism effect and drag and drop it to the footage. This will add a certain amount of 3D effect to the footage.
Adjust the amount to about 13.0 to 14.0.
Return to the search bar and enter Color Correction. Drag and drop the effect to the footage.
Click Exposure and change the Highlights, Midtones, and Shadow. Go to Saturation and reduce it. Move to Color and change the tint of the video by adjusting the Global option. Additionally, change the Highlights, Midtones, and Shadows. Wait a couple of minutes for it to render.
After rendering your video, you will achieve the final results with the VHS filter in Final Cut Pro. The video will look like it was created in a VCR Video format.
Bonus Tip: How to Do VHS Effect with MiniTool MovieMaker?
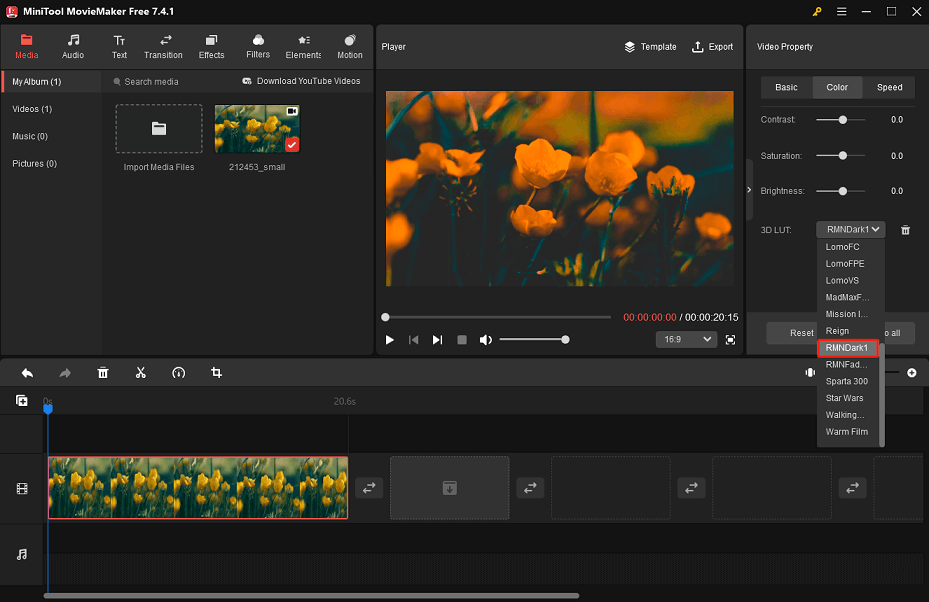
Are there any other user-friendly video editors that you can try to add VHS effects to decorate your videos? Yes, MiniTool MovieMaker is a great option as it offers amazing retro camera effects and film grain filters that you can add to your videos to make them visually appealing. In addition, you can also use it to add some 3D LUTs such as RMNDark1 to make a VHS-style video.
MiniTool MovieMakerClick to Download100%Clean & Safe
Steps to add the RMNDark1 to a video:
- Download, install, and open MiniTool MovieMaker on your PC.
- Close the promotion window to enter the editing interface.
- Click Import Media Files to import the video you want to give it a vintage feel.
- Drag and drop the imported video to the timeline below and leave it highlighted.
- Go to Video Property, click the Color tab, and expand the 3D LUT drop-down menu to select RMNDark1. In the preview window, you’ll see that the video has a retro feel.
- Furthermore, you can change the video’s contrast, saturation, and brightness in the Color tab according to your preference.
- Once done, click Export to make some output settings and save the created VHS-style video to your PC.
Final Words
Wish to create a video that will impress anyone who enjoys vintage style? Refer to the Final Cut Pro VHS effect instructions above to do just that.
User Comments :