Audio compression is a common task when working with audio files. Do you know how to compress audio in Premiere Pro? This article from MiniTool MovieMaker (one of the best free video editing software) will tell you the steps and provide two alternative methods.
Premiere Pro is one of the leading video editing software tools used by professionals, and it provides a wide range of audio editing features, including the ability to compress audio. In this guide, I’ll walk you through the process of compressing audio in Premiere Pro and also look at two other alternatives: MiniTool MovieMaker and MiniTool Video Converter. These tools can be great options for users looking for simpler solutions.
How to Compress Audio in Premiere Pro
Step 1: Before you compress audio, you need to import your media into Premiere Pro. Open Premiere Pro. Go to File > Import, or simply drag your audio or video file directly into the project panel. Once imported, drag your file onto the timeline to start working with it.
Step 2: To compress the audio, you need to use the Dynamics effect in Premiere Pro. Go to the Effects panel on the right side of your screen. In the search bar, type Dynamics and drag it onto the audio clip in the timeline.
Step 3: Once the Dynamics effect is applied to the audio clip, you need to adjust the settings. Select the audio clip in your timeline. Open the Effect Controls and locate the Dynamics effect, and click the Edit button. This will open the Dynamics processing window.
Step 4: Adjust the Compression Settings. Now, it’s time to tweak the compression settings to get the sound you want. In the Dynamics Processing window, you’ll see several settings: Threshold, Ratio, Attack, Release, MakeUp. You can make some adjustments according to your needs.
Step 5: Once you’re satisfied with the result, it’s time to export the project. Go to File > Export > Export As.

How to Compress Audio with Premiere Alternatives
While Premiere Pro is a powerful tool for audio compression, it can be overwhelming for beginners or those who need a quicker solution. Here are two alternatives that can help you compress audio with more simplicity: MiniTool MovieMaker and MiniTool Video Converter.
MiniTool MovieMaker
MiniTool MovieMaker is a free, user-friendly video editing application. You can also compress audio by trimming the length of audio clips. Here’s how to use it:
Step 1: Click the button below to download MiniTool MovieMaker and install it on your computer.
MiniTool MovieMakerClick to Download100%Clean & Safe
Step 2: Open this software and close the promotion window. Click on Import Media Files to import the audio file you want to compress. Then, drag the audio clip to the timeline.
Step 3: Hover your mouse on the edge of the audio until a trim icon appears. Then click and drag your clip inwards. This way, you can remove unwanted parts, which also reduces the file size.
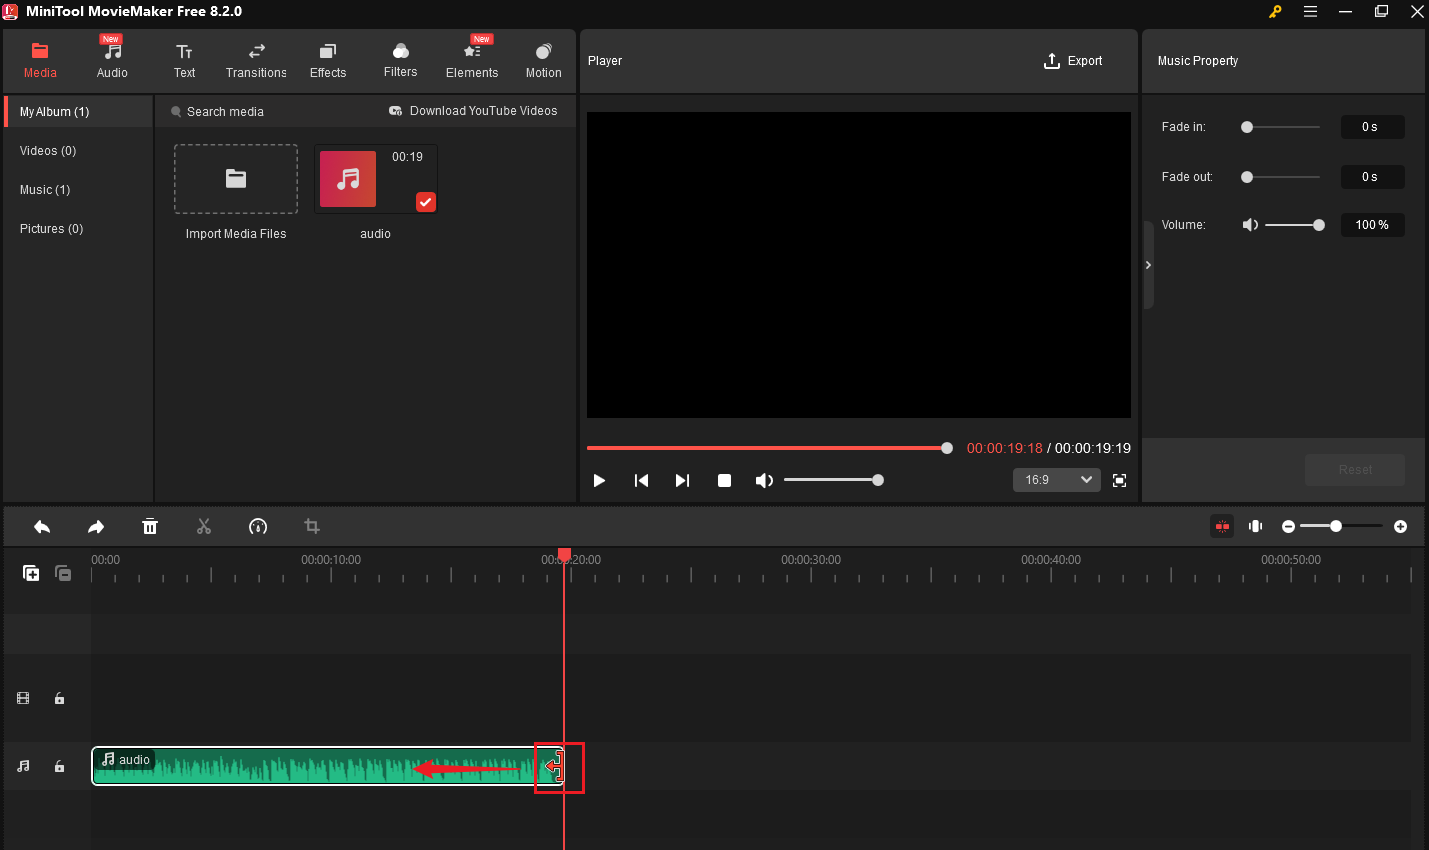
Step 4: If necessary, you can also adjust the volume levels to decrease the loudest parts. Just go to the Music Property window, drag the Volume slider to the left.
Step 5: Once you’re happy with the trimmed audio, click Export in the top-right corner. In the Export window, choose MP3 as the output format and click Export again to save the trimmed audio file on your computer.

MiniTool Video Converter
MiniTool Video Converter is another great alternative for compressing audio files. You can compress audio by adjusting the output format and reducing the bitrate or sample rate. Here’s how to use it:
Step 1: Download and install MiniTool Video Converter on your PC.
MiniTool Video ConverterClick to Download100%Clean & Safe
Step 2: Open the program and click Add Files or the central box to import your audio file.
Step 3: Click the gear icon on the target file to adjust the output settings. Choose Audio in the pop-up window, and select the desired format in the left sidebar. Usually, MP3, OGG, AAC, and WMA can bring small file sizes. Then, you can choose Low Quality for a smaller file size.
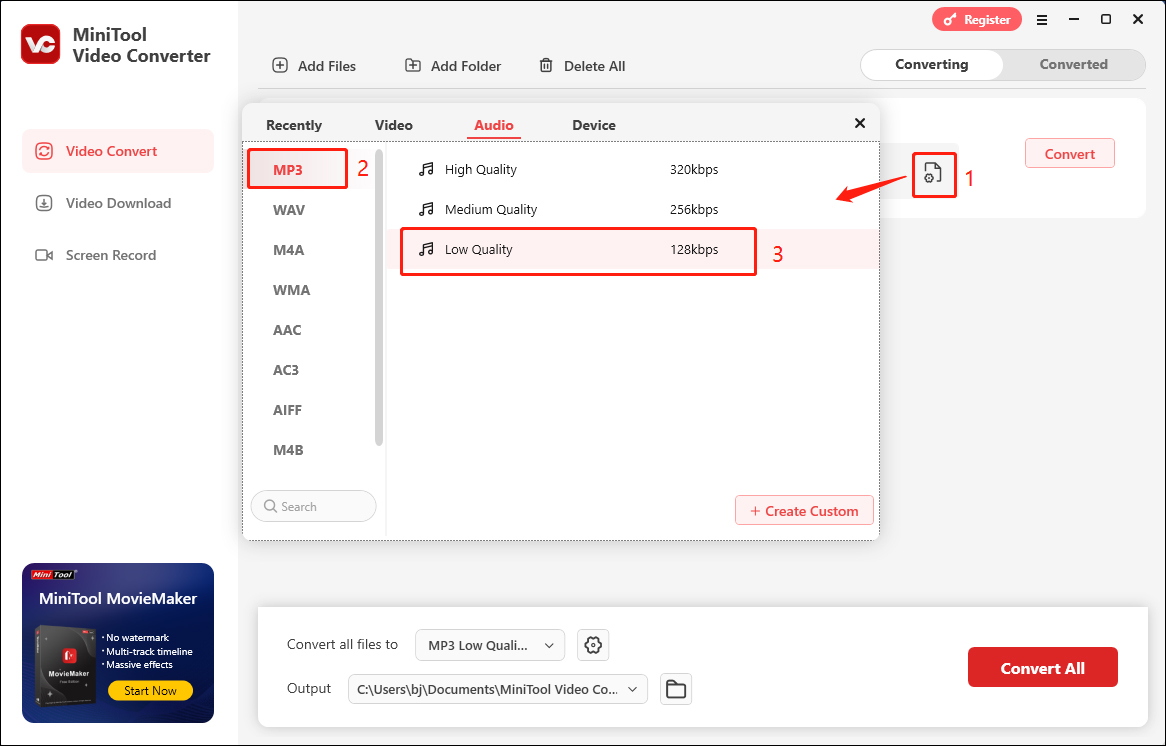
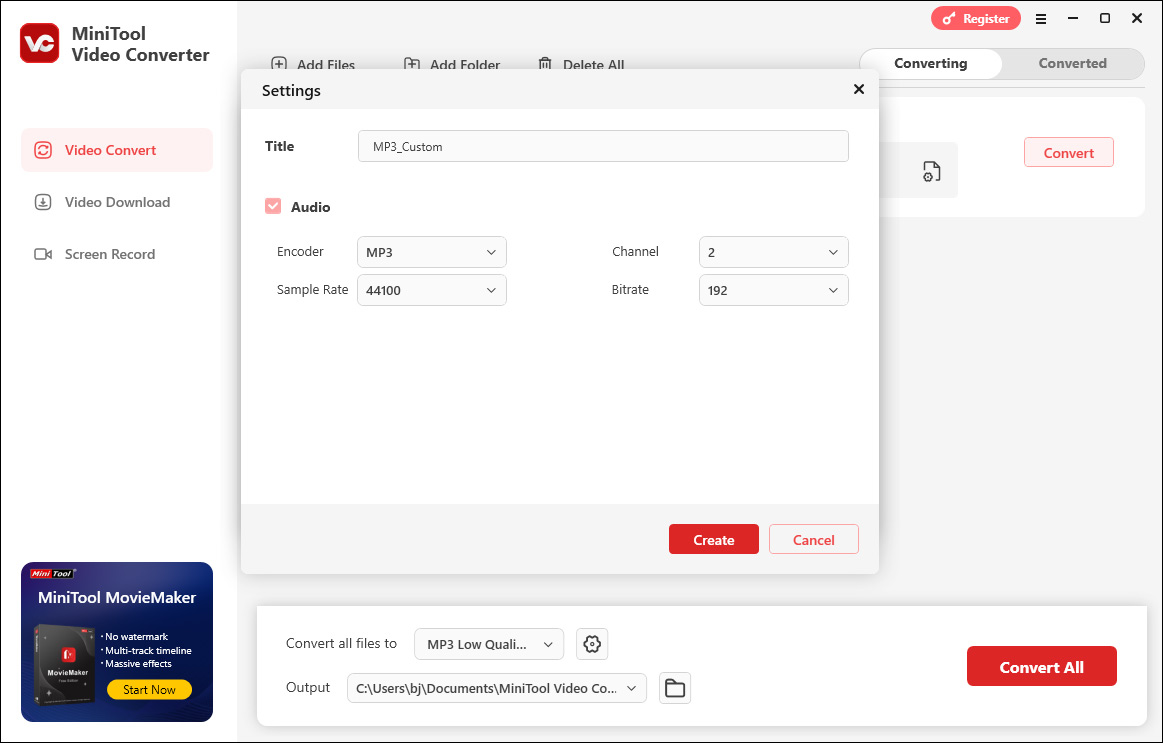
Step 4: To make better compression, you can click on + Create Custom, and change the Sample Rate and Bitrate to a lower level. Then, click Create to save the settings and click the newly created setting to apply it.
Step 5: After completing all adjustments, click the Convert button to process the file.
Bottom Line
This is all about how to compress audio in Premiere Pro. Premiere Pro is perfect for professionals who need precise control over compression, while the alternatives are great for quick, straightforward audio compression tasks. By reading this article and choosing the right tool, you can compress the audio file more effectively.
About The Author

Position: Columnist
Yulia has a great passion for life. She enjoys photography and travel, and is always eager to record cherished moment through her lens. This also led to her strong interest in video editing, and she kept learning multimedia-related knowledge, hoping to bring readers better advice on images, audio, video, and related topics.
User Comments :