Can Camtasia compress video? Yes, this post describes how to compress video in Camtasia. You can also try another video editor, like MiniTool MovieMaker, to compress video.
Camtasia might be the choice if you are seeking a program that can capture your screen to make a video tutorial or lesson. It is one of the most popular screen recording and video editing programs on the market. Plus, a lot of people use Camtasia since it will enable you to edit your video right after you record your screen.
Can Camtasia compress video? Read the step-by-step guide below to compress a video file in Camtasia.
How Do I Reduce the Size of a Video in Camtasia?
There are a lot of reasons why Camtasia generates a large file-size video. It can be with the video dimension, video format, video resolution, and video frame rate. However, you can change these things to make the file size lower. Refer to this part thoroughly to find out how to compress video size in Camtasia.
Step 1: First of all, you need to download and install the Camtasia software on your computer. After downloading and installing, run it on your computer.
Step 2: Create a new project and click the Import Media… button within the Media section. Choose your video from File Explorer and click Open. Wait until the video upload is complete. Drag and drop it into the timeline.
Step 3: Then, click on the video on the timeline, place the mouse pointer at the beginning or end of the video, and when the pointer turns into a double-headed arrow, move the arrow to the right or left to trim the unwanted parts.

Step 4: Click the Export button in the upper right corner of the interface and select the Local file… option from the drop-down menu.
Step 5: If you are trying the free version of the software, click the Produce with watermark button to continue; if not, you need to buy the premium plan to export video without a watermark.
Step 6: In the Export Local File window, set the file name and save location for the video. Then, expand Advanced Settings and select Encoding. From there, adjust the frame rate value to reduce the size of the video.
Step 7: Lastly, click the Export button at the bottom to save the compressed video to your computer.
This is how video compression is done in Camtasia. After exporting, you will notice that the video is smaller than the original.
Bonus Tip: Compress Video with Another Good Video Editing App
MiniTool MovieMaker is a free video editor many video content creators strongly recommend. This offline app enables you to compress your video by adjusting its size, format, resolution, etc. Also, it includes basic and advanced editing tools that you can take advantage of, such as a video splitter, video trimmer, video reverser, video cropper, video flipper, video rotator, and so on.
Moreover, it supports importing various video formats, like MP4, WMV, MKV, AVI, VOB, 3GP, etc. What’s even better about this app is that you can have your video compressed without any watermark.
Here are the simple steps to compress video in MiniTool MovieMaker.
MiniTool MovieMakerClick to Download100%Clean & Safe
Step 1: First, download and install the MiniTool MovieMaker application on your computer. Open it and close the promotion window to enter its main user interface.
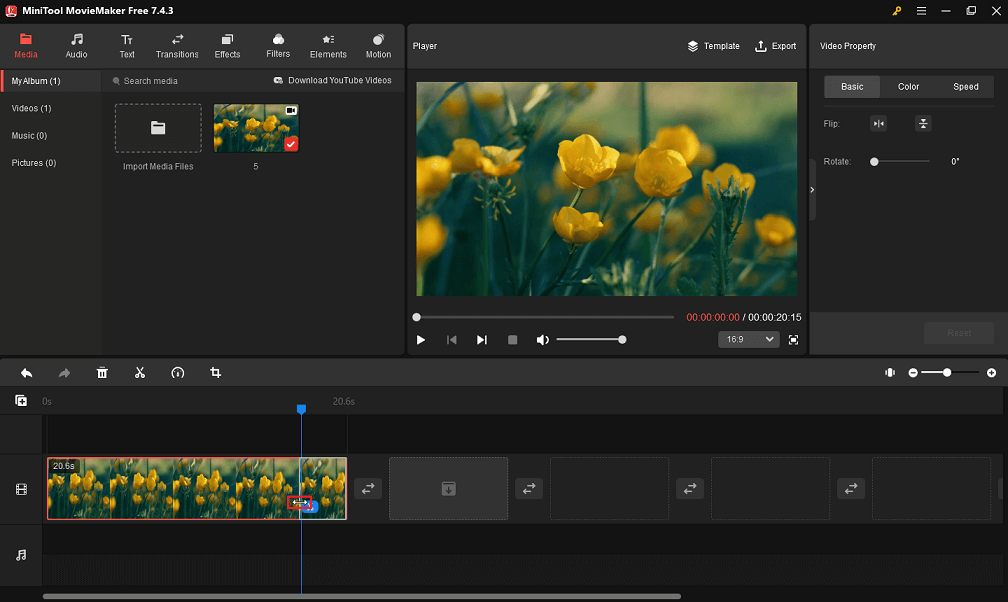
Step 2: Click the Import Media Files button under Media to import the video you want to compress. Drag and drop the video you import to add it to the video track in the timeline.
Step 3: Next, click the video on the timeline, put the mouse cursor at the beginning or end of the video, and when the cursor turns into a two-headed arrow, move the arrow to the right or left to trim the undesirable parts.

Step 4: Click the Export button at the top right of the interface to bring up the output settings window. Here, name the video file and choose where to save it.
Step 5: Expand the Format or Resolution drop-down menu to select a lower value than the original video to reduce its size.
Step 6: Click the Export button at the bottom to save the compressed video without a watermark to your computer.
Conclusion
Can Camtasia compress video? The answer is yes, and you can do it by following the step-by-step instructions above.


User Comments :