Would you like to quickly replace clips in After Effects? This skill is actually pretty easy to learn if you follow the right instructions. In this MiniTool MovieMaker webpage, you will know how to replace footage in After Effects. Let's see how to do it!
How to Replace Footage in After Effects?
After Effects allows you to replace the source material of a video in the Available Media and link it to a new source file. When you replace footage, the clip instances remain in the asset’s Expert timeline view and the Project panel, with the same In and Out points.
Nonetheless, the video clip is associated with the replacement footage, not the original footage. For example, you can replace a clip in After Effects with a soundtrack in one language, or a soundtrack in a different language with another clip of a similar type.
Edits to the original footage are retained in the media, even though it is the original footage that is being replaced. Here is a simple guide on how to replace a clip in After Effects:
Step 1: Select the clip in the Project Assets panel that needs a new source clip to replace the clip in After Effects.
Step 2: Click on the clip and replace the footage. Also, you can ctrl-click or right-click the clip and select Replace Footage.
Step 3: Click on the new file in the Replace dialog box and hit Open. When you do this, the old clip is replaced by the new one, and the new clip is associated with all instances of the old one.
How to Start Quick Edits in After Effects the Other Way?
Replace a Clip with Shorts
Swapping or adding clips within a composition is a common After Effects procedure. There are two useful and always-on shortcuts for quick and easy changes. There is always the option to drag footage to add it to the composition. But you can also use the shortcuts CMD + / (on a Mac) and CTRL + / (on a PC) to add the clip to the composition.
If you would like to replace a layer in the composition with another clip, you need to select the layer from the composition and the clip in the project, then use the shortcuts CMD + OPTION + / (on a Mac) and CTRL + ALT + / (on a PC).
Use Proxy to Improve Preference
The low-resolution movie or still is used by the Proxies for faster previews. The Proxy comes in handy when working on larger files to reduce them to smaller ones. To do this, simply click on the Project video clip, select Create Proxy and then click the Movie or Still option.
Besides, the Render Que opens for users to set up the Output Module and Render Setting in order to set up the Proxy. You can adjust the Output setting to JPEG or whatever format you like, but by default, the Render setting is half the size of the draft.
When the Proxy Render is complete, you’ll notice a square next to the footage. This indicates that you are using the Proxy and that it is active. When you want to stop using it, you can click on the square that changes to outline to turn off the Proxy.
Also read: How to Export After Effects to MP4 with/Without Media Encoder
Bonus Tip: Editing Footage in MiniTool MovieMaker
In addition to learning how to replace materials in After Effects, this page gives you tips on how to edit footage quickly and easily.
MiniTool MovieMaker is an excellent video editing software similar to After Effects for beginners and professionals to create stunning videos. It has an intuitive user interface and rich editing tools. To make your projects stand out, you can not only add transitions, filters, motions, subtitles, and stickers to your videos but also split, trim, crop, flip, rotate and reverse them.
Here are just a few easy steps to edit your footage and give it a professional look:
1. Download, install, and launch MiniTool MovieMaker on your PC.
MiniTool MovieMakerClick to Download100%Clean & Safe
2. Close the Project library window and enter the main interface of MiniTool MovieMaker.
3. Click on Import Media Files under the Media tab to import your source materials to this software.
4. Drag and drop the imported media files to the timeline below.
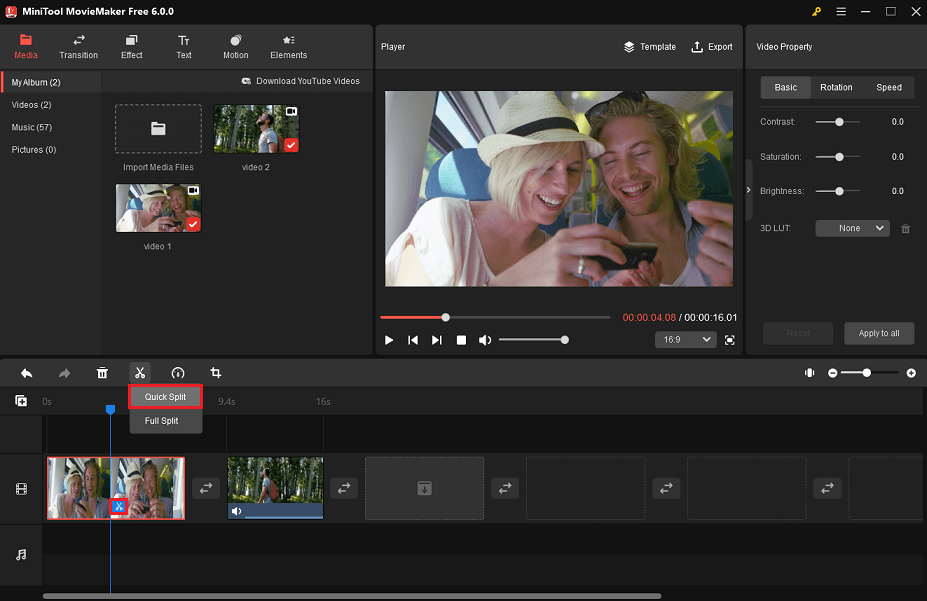
5. Click on the footage you want to split quickly in the timeline, move the playhead to the target position, click the scissors icon on the playhead or click the scissors icon on the toolbar above the timeline and select Quick Split.
6. Right-click on the unwanted partition and select Delete.
7. Choose an aspect ratio for your video from the bottom right corner of the preview window.
8. Click the Export above the preview window to save your video.

Conclusion
Whether you’re a pro or a novice, knowing how to replace footage in After Effects quickly can save you a lot of time and energy. Plus, you can try out the quick tips used in MiniTool MovieMaker above to improve your project.
User Comments :