Sony Vegas is an extremely useful professional video editing application that includes all the advanced features. It has an Event Pan/Crop button that you can use for quick tasks such as rotating the clip, zooming in, or cropping. All of these features are well managed on the application so that even a beginner can use it with ease.
While Sony Vegas is a highly interactive and feature-rich program for all users’ video editing needs, it is quite costly as users need to pay $599.00 to access it. So, if you are looking for an affordable and easy-to-use solution for your video editing needs, MiniTool MovieMaker will be the ideal alternative. It offers all the powerful features with an intuitive interface that can be accessed by pros and novices alike. For example, you can use this video editor to crop clip, apply amazing transitions, trim video, split video, add beautiful filters, reverse clip, etc.
MiniTool MovieMakerClick to Download100%Clean & Safe
How to Crop Video in Vegas Pro
For the Vegas Pro crop video, let’s check out the step-by-step guide below.
Step 1. Import Video
First, you need to open the Vegas Pro app and then import the required video clip into it. You can then drag and drop it to the app timeline window.
Step 2. Use Event Pan/Crop Option
Simply place a vertical line over the clip you would like to crop; using this option, the outline color will change to yellow automatically.
Click on the Event Pan/Crop button on the screen.
From the pop-up window called Video Event FX, you can also edit video clip size.
You’ll notice a circle and rectangle on the image. To zoom any particular object from the image, you just need to drag the handle from every corner of the rectangle.
You just need to hold the Ctrl key and override it to maintain the aspect ratio of the video.
If you want to move freely over the cropping area, you should select the Move Freely icon in the app window.
You’ll find a small point of white color in the center of the image. Put the cursor on the space available between the circle and rectangle and drag it as needed. Your image will begin rotating around that small white point.
If you don’t find the final results good, you need to right-click the image and then select the Restore option from the drop-down menu. It will automatically remove all the recent changes and restore your actual image.
This application enables users to crop a few specific portions of video clip depending on their needs.
Step 3. Save the Project
Lastly, when video editing is finished, click the Save button to make sure that modifications are saved for the future.
Moreover, you can utilize the keyframe settings at the bottom of the Event Pan/Crop window to establish it for the event if you wish to create an animated crop and zooming effect.
Bonus Tip: How to Crop Video in MiniTool MovieMaker
For video cropping on Windows, you can also try MiniTool MovieMaker. See the easy step-by-step guide below.
Step 1: Download, install, and launch MiniTool MovieMaker on your computer.
MiniTool MovieMakerClick to Download100%Clean & Safe
Step 2: Close the pop-up window and get to the main interface of the movie maker.
Step 3: Click Import Media Files to import the video you wish to crop and drag it to the timeline.
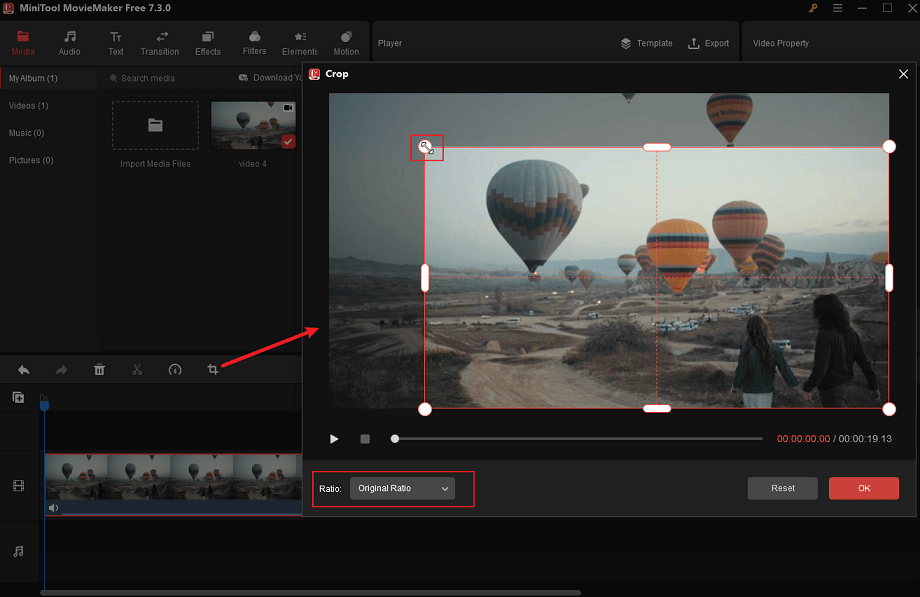
Step 4: Keep the video on the timeline selected and hit the Crop icon on the toolbar.
Step 5: You can manually crop your video by dragging any side or corner of the rectangle on the interface. Alternatively, expand the Ratio drop-down list to pick a preset ratio to crop the video. When satisfied, click OK to save the adjustments.
Step 6: Click Export to configure the output settings for your project and then save the cropped video to your computer.

Conclusion
The Vegas Pro crop video step-by-step guide is described above. Besides, you can also give MiniTool MovieMaker a try to crop your video with ease.
User Comments :