How to Create Clouds in Photoshop?
This is an easy way to learn how to make clouds in Photoshop.
Step 1. Create a new document of any size, then apply the gradient.
Any size is fine, but you likely will not require an area larger than 1500×1500 pixels to work. Gradient controls are represented by a box-shaped icon with the color fading from black to white. Click on this and apply the gradient of your choice.
Step 2. Set the resolution and color mode to RGB.
The resolution is a matter of preference. However, a closer view allows for greater precision. To set the color mode to RGB, click Image in the menu bar, then Modes in the submenu. You should be able to select your preferred color mode here.
Step 3. Create a new layer.
Use the gradient tool again to apply a gradient to the new layer. Now, use the gradient editor and choose two variations of blue, like dark blue and sky blue or midnight blue and royal blue to be applied to the new layer.
Remember to keep the topmost part of the layer the one with the darker blue.
Step 4. Render clouds.
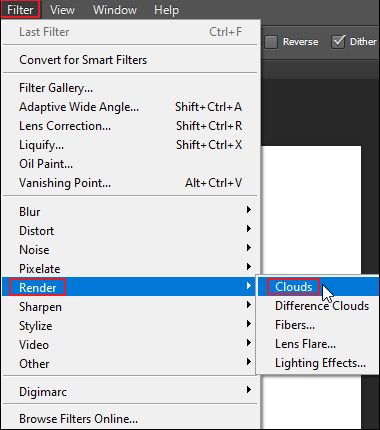
Now that you have prepared the colors and layers, you can render the clouds using Photoshop. Click through from the main menu bar: Filter > Render > Clouds. This creates your clouds.

Step 5. Change the cloud levels.
To bring up the Levels dialog box, use the shortcut Ctrl+L. From there, you should adjust the levels of the clouds by evenly changing each of the three arrows through the middle of the distribution.
Step 6. Make another new layer.
This will be the landing zone for the cloud layer’s components. Go back to the cloud layer once you’ve completed the blank layer.
Step 7. Choose all of the components of the cloud layer.
Click the thumbnail of the cloud layer to choose all of its parts, or you can press Ctrl+A. Next, right-click on and choose copy to add it to the clipboard, or press Ctrl+C.
Step 8. Turn on the Quick Mask Mode.
This mode is most appropriate for quick editing and is used to add/subtract from the picture to create a mask, just like a digital stencil. To open Quick Mask Mode, click the new layer and then press Q on the keyboard.
Step 9. Paste the components into the new layer.
Speed the process by using the shortcut Ctrl+V to paste on Windows or ⌘ Cmd+V to paste on Mac. After you’ve added the components of the cloud layer, you can turn off the Quick Mask Mode by clicking on the layer thumbnail and again pressing the Q key.
Step 10. Fill in the lines created in the Quick Mask Mode.
The mode works similarly to a stencil, letting you add/subtract to unprotected areas of the picture. Now that you have selected Quick Mask Mode, running lines (sometimes known as marching ants) will appear. Fill these areas with white or press Ctrl+← Backspace to fill the chosen areas automatically.
Step 11. Apply an emboss effect.
This can be added as a filter to the layer by heading to the blending options. From the main menu bar, select Filter, which should include Emboss. Change the settings of the emboss effect or experiment with the settings until you find an effect you want.
Step 12. Apply other filters.
One you might wish to consider is known as Difference Clouds, which can give your clouds a more realistic feel. Click or press Ctrl+J to copy the cloud layer. Apply the Difference Clouds Filter by going to the Filter section of the main menu bar, then to Render, where you should locate Difference Clouds. Use these commands to apply the Filter twice or just press Ctrl+F to reapply your last used filter.
MiniTool MovieMakerClick to Download100%Clean & Safe
Conclusion
The above is an easy way you can learn how to create clouds in Photoshop. I hope this step-by-step guide helps you out.


User Comments :