Disney Plus has been available for some time, and it’s becoming more and more popular as it expands around the world. One trustworthy feature of Disney Plus is its high video quality. This post on MiniTool MovieMaker will guide you on how to change video quality on Disney Plus with only a couple of simple steps.
What Video Formats Does Disney Plus Provide?
Before we get into how to adjust video quality on Disney Plus, let’s take a look at what video formats are available on Disney Plus. It provides a growing collection of content that allows for high-quality streaming. Based on the title and streaming device, the options below may be available:
- Full HD: In comparison to standard HD (720p), this format has a 1080p resolution and higher definition image.
- 4K Ultra HD: 4K Ultra HD displays a resolution of 3840 x 2160 pixels and a sharper image than Full HD video.
- HDR10: This is the default HDR format. HDR10 is an abbreviation for High Dynamic Range that displays a wider array of brightness and colors.
- Dolby Vision: The format is a more dynamic HDR version. Dolby Vision adjusts the brightness and colors so that every frame of the video is optimized for your screen.
- IMAX Enhanced: It features an expanded 1.90:1 aspect ratio which enables the image to include the full height of the screen.
MiniTool MovieMakerClick to Download100%Clean & Safe
How to Change Video Quality on Disney Plus?
It’s not complicated to change the video quality on Disney+, however, you will not get as many options as you do on other platforms such as YouTube. In general, Disney+ automatically detects your system’s functionality and changes the video quality to the optimal option supported by your device.
But if you would like to impose some rules, you can do so in the app settings.
How to Change Video Quality on Disney+ (Desktop)
Step 1: Go to Disney+ in your web browser and mouse over the profile icon.
Step 2: Click App Settings.
Step 3: Select your preferred option.
- Automatic – Streams up to 4K UHD in the highest quality available.
- Moderate – Consumes less data; streams up to HD quality.
- Save Data – Consumes the least amount of data; streams in SD quality.
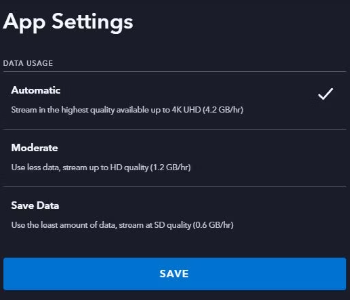
Step 4: Click on Save.
How to Change Video Quality on Disney+ (Mobile)
Step 1: Open the Disney+ app and tap on the profile icon at the bottom right.
Step 2: Access App Settings.
Step 3: Tap on Wi-Fi Data Usage / Cellular Data Usage under the Video Playback option.
Step 4: Tap on Automatic if you need to stream in HD. Or, if you want to stream at SD quality, tap on Save Data.
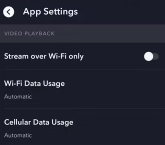
Additionally, if you do not want the Disney+ app to use your data, you can enable Stream over Wi-Fi only.

Why Is There Low-quality Video?
The following are a few factors affecting video quality. Try these steps to enhance your streaming experience:
- Make sure the title you’re watching is available in your favorite video format on Disney Plus.
- Check that your TV, display, or device can stream high-quality video content.
- Avoid streaming via an in-line video / game recorder (To protect from piracy, the use of these devices might limit the video quality or prevent playback.).
- Check the data usage settings on your device (A lower data usage setting will provide lower visual quality.).
- Confirm that your network connection satisfies the speed recommendations.
- Follow the troubleshooting guide to help improve video playback.

Conclusion
After reading the above content, you must know how to change video quality on Disney Plus. As you can see, the process is very simple and doesn’t take much time. Have a go now!
User Comments :