DaVinci Resolve’s free and paid versions both provide all of the tools you’ll need to create high-quality videos. For this, you want the best frame rate possible for your videos to run smoothly as well as reflect a professional standard.
It is simple to alter your frame rate setting in DaVinci Resolve, but you may encounter problems if you do not change the settings quickly enough. We will show you how to change project frame rate in DaVinci Resolve and how to resolve it if you are stuck on a frame rate you do not want.
How to Change Frame Rate in DaVinci Resolve?
To ensure your projects are always running at the desired FPS, make the habit of setting the frame rate before uploading anything to your timeline. This is because once you upload media to your timeline, your timeline frame rate setting is locked in.
To alter the frame rate, navigate to File > Project Settings. Or, you can click on the cog wheel in the lower right corner of the screen in the Edit window or use the keyboard shortcut Shift + 9.
In the Project Settings window, select the Master Settings tab. Then, locate the Timeline Frame Rate option and click the number to show the pull-down menu. You can now choose the number of frames per second you desire for your project.
What to Do When Your Project Gets Stuck at the Wrong Frame Rate Setting?
Now that we have learned how to change the frame rate in DaVinci Resolve, let’s take a look at the workaround in case you get stuck with the wrong FPS.
As we mentioned before, once you upload something to your timeline, your timeline frame rate is locked in. This can lead to a ton of frustration if you have just spent hours editing, only to find that you cannot make your video 60FPS, for instance.
The best approach to resolving this is to create a new timeline with the desired timeline frame rate settings. To do so, click File > New Timeline or press Ctrl/Cmd + N.
You can also right-click (Windows) or Ctrl-click (Mac) on empty space in the Media Pool. Next, navigate to Timeline > Create New Timeline, or press Ctrl/Cmd + A to choose all of your clips and select Create New Timeline Using Selected Clips and Bins.
The advantage of this last choice is that your clips are carried over to the new timeline. Any of these ways will display a pop-out window of the Timeline settings.
Make sure the Use Project Settings box at the lower left corner is unchecked; this allows you to change the settings in multiple tabs. You can change the Timeline Frame Rate by going to the Format tab.
You can also uncheck the Empty Timeline box within the General tab to save time. When you complete the process by clicking Create, the clips from your original timeline will be transferred.
If your new timelines are not operating at the desired frame rate for whatever reason, then there is one last foolproof way. Click File > New Project and instantly change the timeline frame rate settings in the Project Settings window. Next, copy your original work and paste it over to this new project.
You may also like: What’s the Best Frame Rate for 4k Video? 60 FPS or 50 FPS?
Bonus Tip: How to Change Project Frame Rate with a DaVinci Resolve Alternative
In addition to DaVinci Resolve, there are a number of other professional video editing software programs that will allow you to change the frame rate of your project. MiniTool MovieMaker is the one you should not miss out on, so let’s see how you can use it to change the frame rate.
MiniTool MovieMakerClick to Download100%Clean & Safe
Step 1: Download and install MiniTool MovieMaker by clicking on the download button above. Launch it on your computer and close the promotion window to enter its main interface.
Step 2: Click Import Media Files to import your project that you would like to change the frame rate of.
Step 3: Drag and drop the imported project onto the timeline below.
Step 4: Make changes to your project, such as adding filters or stickers, splitting/trimming/cropping, changing the aspect ratio, etc.
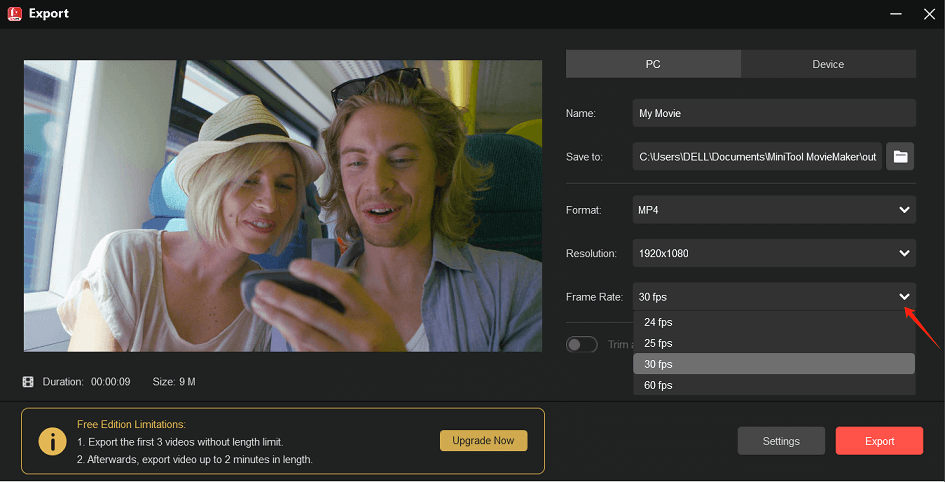
Step 5: Click Export in the upper right corner to bring out the export settings window. Not only can you expand the Frame Rate drop-down menu to select the appropriate one, but you can also name your project, choose the destination folder, and customize its format, resolution, quality, etc.
Conclusion
In a nutshell, you can learn how to change frame rate in DaVinci Resolve as well as what to do when your project is stuck on the wrong frame rate setting in this post.
User Comments :