Synchronizing audio and video is very important in the video editing process. Sometimes, you may need to adjust the audio speed to match the video rhythm or to achieve special sound effects. This article from MiniTool MovieMaker (a free movie maker) will introduce how to adjust audio speed in Premiere Pro.
How to Adjust Audio Speed in Premiere Pro
Premiere Pro provides flexible audio speed adjustment tools, and you can better control audio speed. In the following, I will show you how to adjust audio speed in Premiere Pro.
Method 1: Adjusting Speed or Duration Setting
In Premiere Pro, the easiest way to adjust the audio speed is through the speed /duration setting. This feature allows you to control the audio speed precisely. Here’s how to speed up audio in Premiere Pro without changing pitch.
Step 1: Launch Premiere Pro, open your project with audio, or create a new project.
Step 2: Select the audio clip on the timeline you want to adjust. Right-click on the selected audio clip and choose the Speed/Duration option from the context menu.
Step 3: In the Speed/Duration window, you’ll see a field labeled Speed. By default, this value is set to 100%. To speed up the audio, increase the percentage above 100%. To slow down the audio, reduce the percentage below 100%. For example, setting it to 50% will slow the audio down to half the speed, while setting it to 200% will double the speed.
Step 4: If you want the audio pitch to remain the same while adjusting the speed, you can check the Maintain Audio Pitch option.
Step 5: Once you’ve made your adjustments, click OK to apply the changes.
Step 6: Go to File > Export > Media to save your work.
Method 2: Using Time Remapping
Premiere Pro also offers a more flexible and powerful way to adjust the audio speed – time remapping. This tool lets you change the overall speed of your audio and freely adjust the rate in different periods to create richer audio effects. Let’s see how to slow down audio in Premiere Pro.
Step 1: Select the audio track on your timeline. Right-click on the audio track and choose Show Clip Keyframes > Time Remapping > Speed.
Step 2: After enabling time remapping, you will see a speed control line on the audio track. To change the speed at specific points in the audio, you need to add keyframes using the Pen Tool.
Step 3: To speed up or slow down the audio, drag the keyframes up or down along the speed control line. Moving the line upwards will increase the speed while dragging it downward will reduce it.
Step 4: Once you are happy with the time remapping adjustments, you can save the work.
How to Adjust Audio Speed in Premiere Pro Alternative
For beginners or users who need a simpler operation, MiniTool MovieMaker – a free video editing application provides an intuitive and easy-to-use alternative to adjust audio speed. Let’s see how to adjust audio speed in MiniTool MovieMaker.
Step 1: Download and install MiniTool MovieMaker on your computer.
MiniTool MovieMakerClick to Download100%Clean & Safe
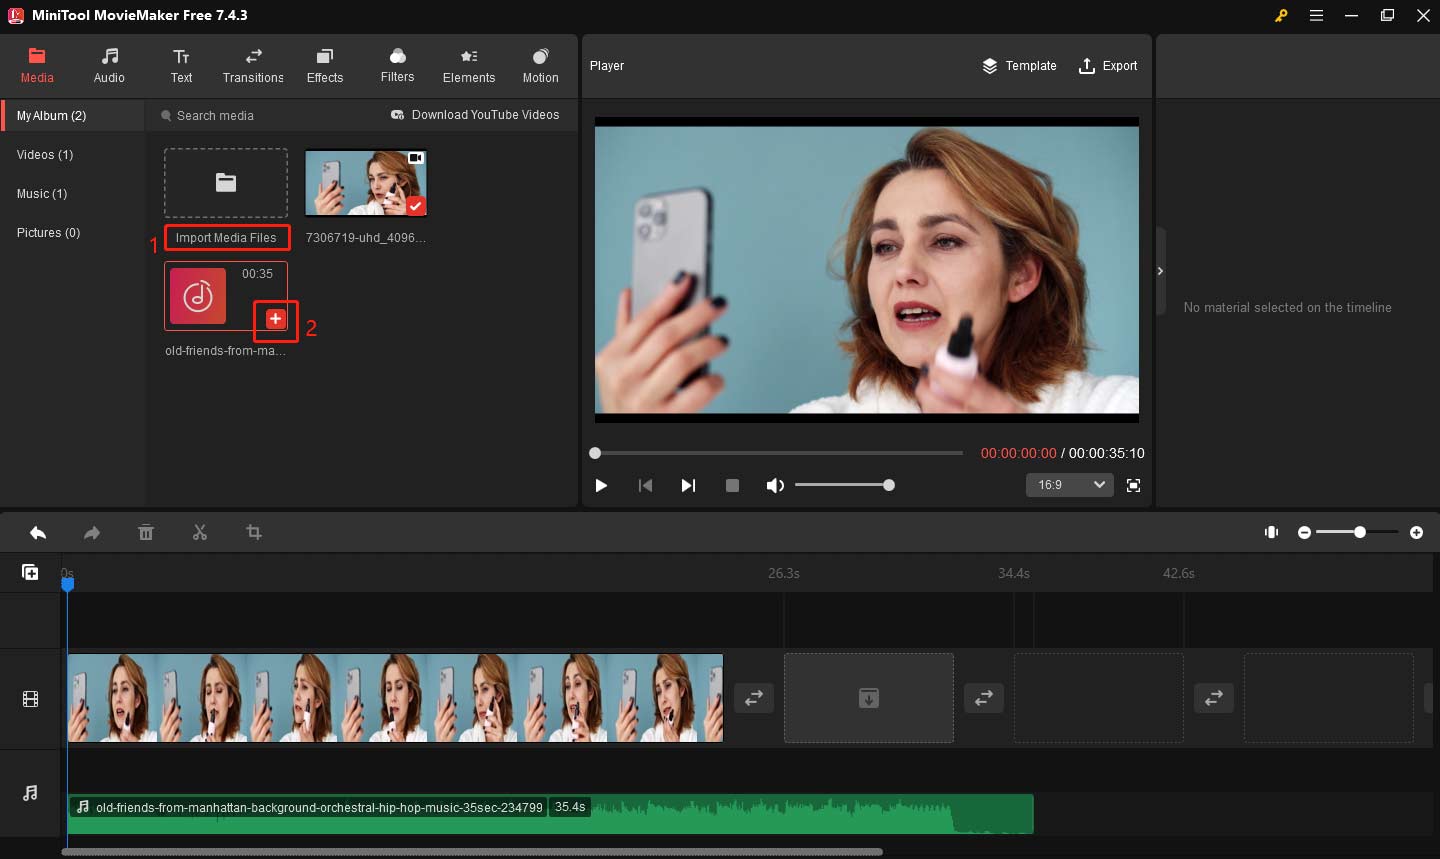
Step 2: Click Import Media Files to import the audio and video files that you want to work with. Click the plus icon on the target file to add it to the timeline.

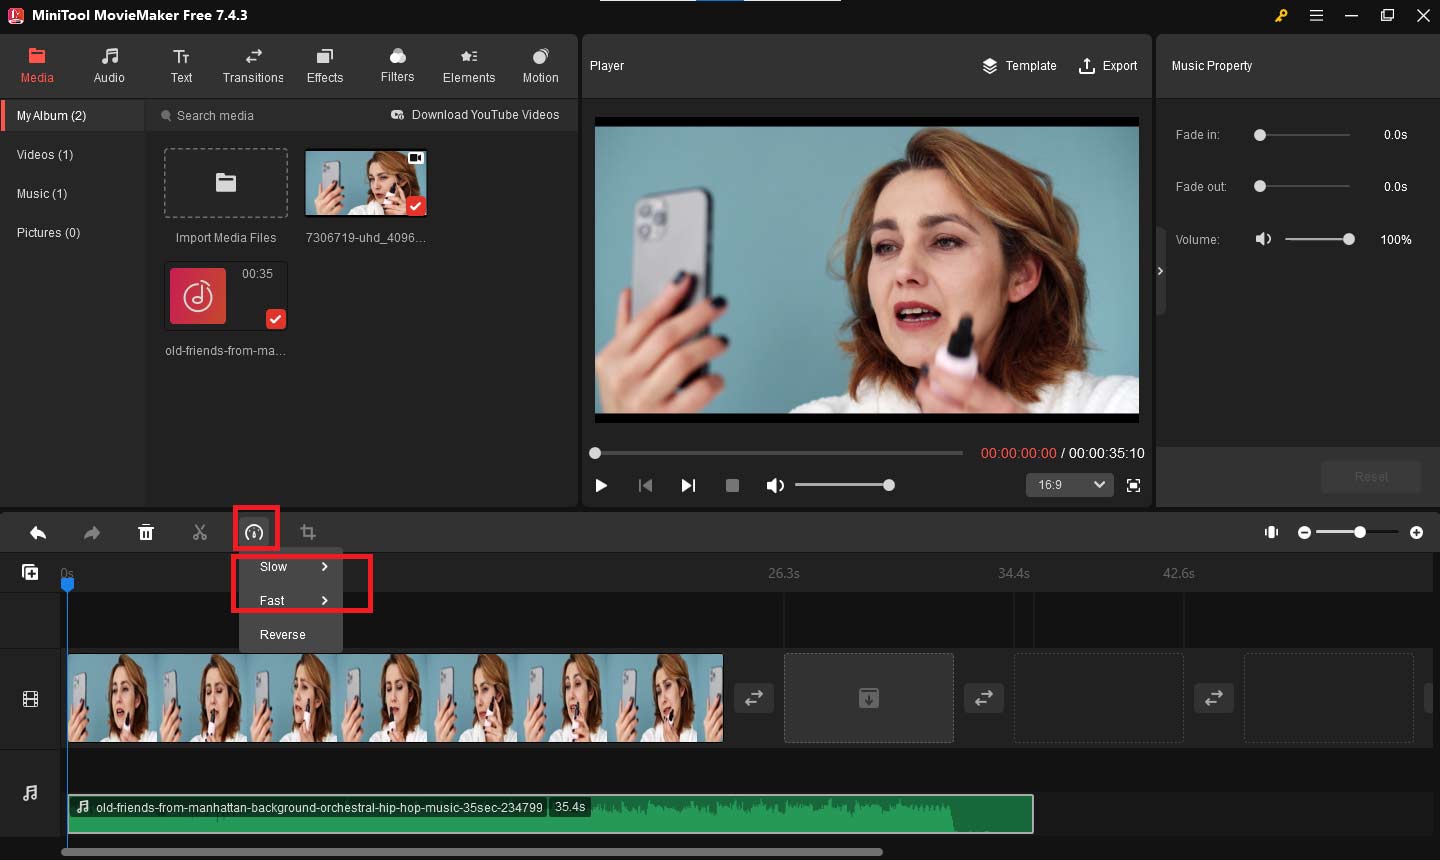
Step 3: Select your audio file on the audio track to highlight it. Click the Speed icon above the timeline. You’ll see three options: Slow, Fast, and Reverse. To speed up the audio, you can choose Fast, and pick up an option from 2X, 4X, 8X, 20X, and 50X. To slow down the audio, you can choose Slow, and pick up an option from 0.5 X, 0.25 X, 0.1 X, 0.05 X, and 0.01 X.

Step 4: After completing all editing, click Export in the upper right corner. Set the output settings in the Export window. Finally, click Export to save your work.
Bottom Line
I believe you have learned how to adjust audio speed in Premiere Pro. Next, you can try this method to add creativity to your work.


User Comments :