How to Add Border in Canva (Mainly Used to Add to an Image)
It’s a little more complicated to create a border around a particular image, but it’s worth the effort. Many designers will not take the time to try the technique we’re about to show you. This simply means that your design is going to stand out a lot more than the others.
Here’s how to add a border to an image in Canva step by step. Take a look:
Step 1. Duplicate Your Photo
Before duplicating your photo, if there is a border around your design that is in the way, move it quickly. The best approach to achieve this is to create a page below the current one and then drag your border to it.
Once you’ve finished editing, you can drag your border back to the current page.
Click the Duplicate button to duplicate your photo now that the border is out of the way. You’ll use the duplicate photo to isolate the object in order to add the border as well.
Remove all of the other elements of the current design on the duplicated copy, leaving only the image.
Step 2. Isolate Your Image Using the Background Remover
To create the appearance of a border that surrounds a particular part of your image, you need to erase everything around that particular part. This is where the background removal tool comes in handy.
First, choose your image and then click on Edit Image. Scroll down the left panel to locate Background Remover and click on it.
Canva will start working right away. It will just take a few seconds to remove the background from the image.
Canva often does an excellent job of removing the background. If something goes wrong, you’ll be able to solve any problems Canva may have caused using the Erase and Restore buttons.
Click Apply when you are ready.
Step 3. Add a Background Behind the Cut-Out Photo
You’ll need to add a small background behind the cut-out photo if you plan for the border to be white or any light color. This will help you view the border when you’re editing it later.
To add a small background, click the Elements tab and then find Lines & Shapes. Click the square shape. This will put a square on the canvas.
Stretch the square so that it covers the whole cut-out photo.
You now need to click Position > Backward to send the square back one layer.
Step 4. Add the “Glow” Effect to Your Photo
Select your photo to begin creating the border and then click on Edit Image.
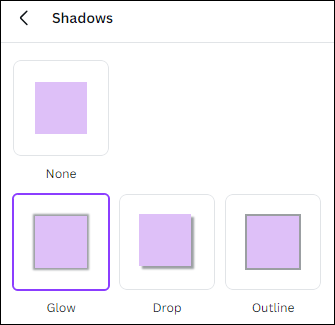
Scroll down the left panel to locate the Shadows section and select Glow. If you cannot find it, hit See All to locate the effect.
Step 5. Modify the Glow Effect
Select the Glow Effect again to access the settings options. The first two options that you should always modify when you create a border around a photo are the Transparency and Blur options.
Make sure the Transparency slider is set to 100. This slider has an effect on how much you can view through the border.
Adjust the Blur to 0. At least at first, you do not want any blur to the border.
With the Transparency and Blur set, you can use the Color Picker to change the color of the border.
The last option to modify is the size of the border. This depends on your photo and how you wish your final design to appear. You can use the Size slider to change the size of the border.
Sometimes the edges of the border feel a little jaggy. To solve this, modify the Blur slider to a 1 or a 2. Anything above that will produce too much blur and may ruin the effect.
Once you’ve completed making your changes, click the Apply button.
Step 6. Drag the Cut-Out Photo to the Original Page
The border around the image is now finished. You can then drag the cut-out photo from page 2 to page 1.
You should position the cut-out photo on top of the original easily.
Also, you can click the Trash Can icon to delete page 2.
Step 7. Move the Border of Your Image Back Into Place
You will now be able to drag your main border back into your design. It should be simple to put it back into place.
MiniTool MovieMakerClick to Download100%Clean & Safe
Conclusion
This is all about how to add border in Canva online, primarily to add to an image. We hope you find this guide helpful and that you enjoy it.
User Comments :