Have you ever took a great shot only to find it was taken in too much light? Do not throw them all away in the trash. You can fix them. How to fix an overexposed photo easily? This post will give you an ultimate guide. (If you want to make a video from photos, try MiniTool MovieMaker for free!)
What Is Overexposed Photo
The exposure of a photograph or a film is the process of creating an image by using light. Overexposure occurs when an image appears lighter than it should be or lighter than a neutral exposure. In this situation, the image becomes extremely bright and overexposed when there is too much light hitting the sensor.
Details in the photo will be lost in the brightest parts of the image. Do you want to find a cure for it? Let’s find out the best method for this case. The following parts will provide detailed information on how to fix overexposed photos properly.

How to Fix an Overexposed Photo
How to fix overexposed pictures? Various tools are available for you. It can be challenging to select the best tool. Now let’s begin the next part to help you find the best methods.
Also read: Image Brightener – How to Brighten an Image
How to Fix an Overexposed Photo with Photoshop
Photoshop is a professional-grade photo editing software from Adobe. To get the detailed process of how to fix an overexposed picture with Photoshop, you can follow the below steps:
Step 1. Install Photoshop on your PC and run it.
Step 2. Click File and Open to browse for an overexposed photo as the background.
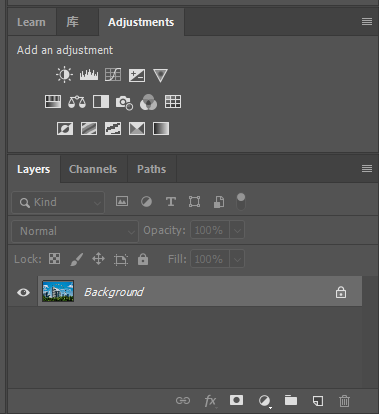
Step 3. Go to the Layers panel to see your photo. It is most likely in the Background layer. Now you need to open the Levels adjustment layer.

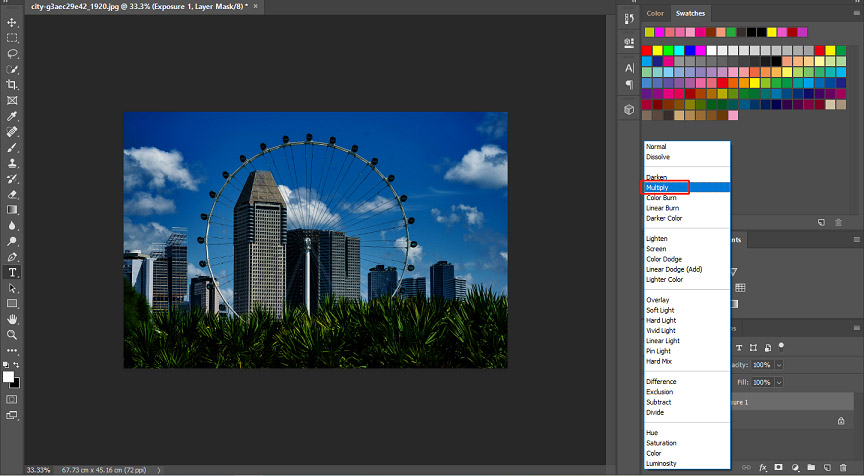
Step 4. Click on the Layers tab in the Properties panel and head to Blend Mode. In Blend Mode, you can see the word Normal in the box.
Step 5. Click Normal and change it to Multiply.

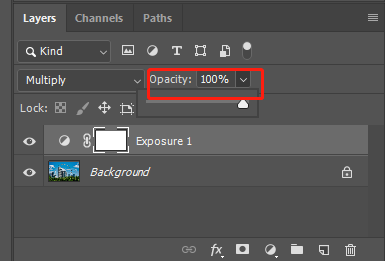
Step 6. Go back to the Properties panel to change the darkness of your image, you can see the Opacity, and then you can lower it.

Step 7. You can also move the slider to lower the opacity. Then click File > Export to export the fixed image.
Want to blend two images in Photoshop? Check this post: How to Blend Two Images in Photoshop – Solved
How to Fix an Overexposed Photo with Lightroom
If you want to know how to fix overexposed photos easier, you can turn to Lightroom. It is another handy tool to manage such conditions. You can follow these steps:
Step 1. Install Lightroom on your computer and run it. Then choose File > Import to import the overexposed photo.
Step 2. Click Auto in the Tone section to see the instant improvements.
Step 3. Move the sliders of the Highlights and Whites in the basic panel. You can adjust highlights and whites.
Step 4. Change to the HSL panel and tap on Luminance. You can bring down the slider of the specific color that is prominent in the background of your images.
Step 5. You can head to the Graduated Filter and set your highlights and whites slider across the panel. Then export and save the photo.
You may also like: How to Remove Background from Image Photoshop
How to Fix an Overexposed Photo with Photos App
If you have an overexposed photo on your iPhone and you do not bother to open your PC, you can directly open Photos app on your iPhone. This method is pretty easy and you don’t need to download any editing app or bother to open the computer.
Step 1. Open your Apple Photos app. Tap on the photo you want to fix.
Step 2. Click the Edit on the top right of the screen. Then tap on the second icon, you can see EXPOSURE and you can change the exposure of your photo.
Step 3. Tap on Done to save your photo.
Conclusion
Based on the above parts, you must have learned how to fix an overexposed photo. Just try the favored tool to fix your photos now! If you have other options we haven’t mentioned, let us know in the comments!


User Comments :