Can you crop in VLC? Of course, the VLC media player allows you to crop a video. We will offer a complete guide on how to crop a video in VLC. Alternatively, there’s an easier way to crop videos with MiniTool MovieMaker.
VLC is a free and open-source media player software that plays most multimedia files. Apart from viewing media content, you can also use it to crop videos. Before that, you should first install the VLC media player on your Windows or Mac. And then check this full guide below.
How to Crop Video in VLC on Windows
If you have installed VLC on your Windows, here are two options to crop video in VLC media player.
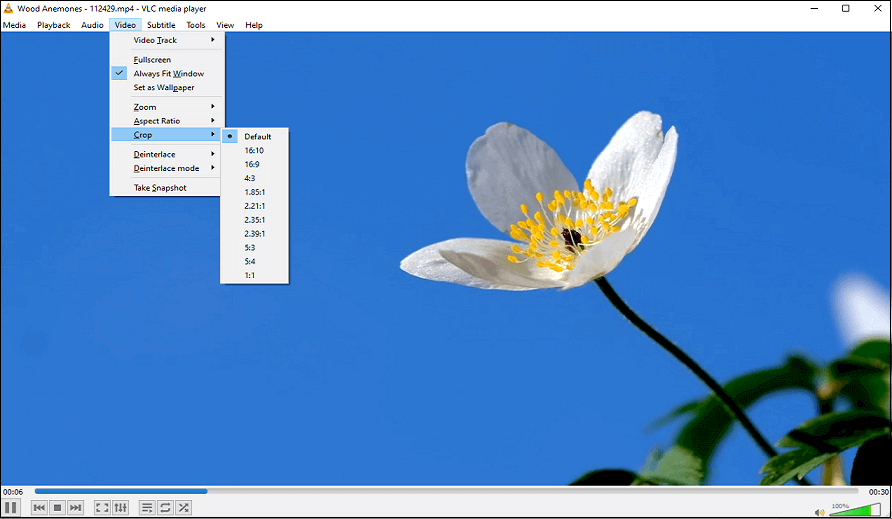
Option 1: Crop a video in VLC with preset aspect ratios.
Step 1. Open VLC, navigate to Media and click Open File.
Step 2. Go to the Video tab and click on Crop.
Step 3. Choose from its preset aspect ratio (16:10, 16:9, 4:3, 1.85:1, etc.) based on your needs.
Option 2: Crop a video in VLC and save it permanently.
Step 1. Open VLC, go to the Media option, and tap on Open File.
Step 2. Click Tools on the menu and select Effects and Filters.
Step 3. Go to Video Effects and tap Crop.
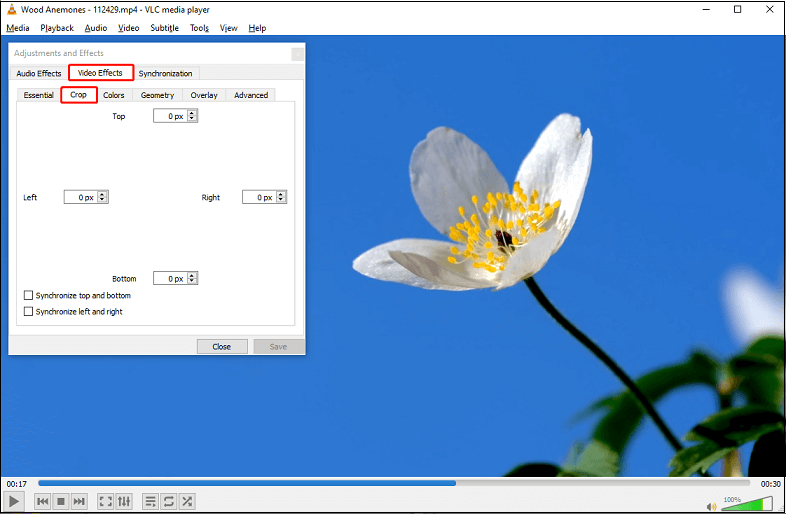
Step 4. Enter the pixels to crop from left, right, top, and bottom. As you increase the number of pixels, the edges of the video will move to the center.
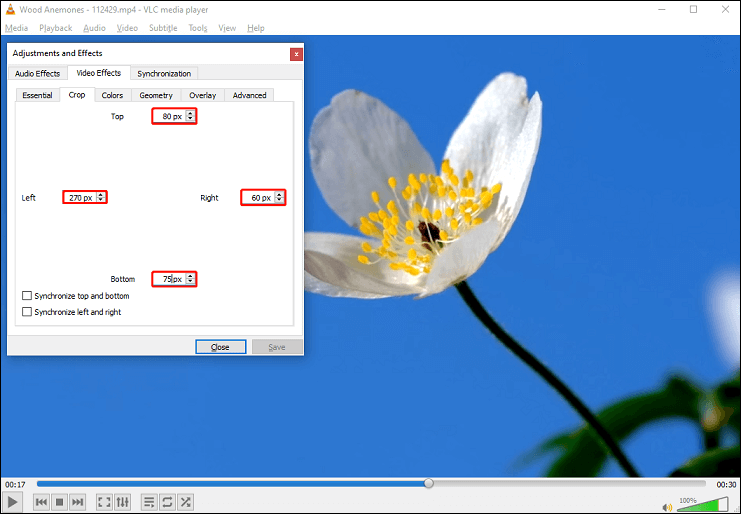
You’d better remember the entered values because they will be used later.
Step 5. Tap on Close to close the window, and go to Tools > Preferences.
Step 6. In the lower-left corner, click on All under the Show settings section to access the Advanced Preferences window.
Step 7. Scroll down to go to Video > Filter > Croppadd.
Step 8. Enter the values you remembered earlier under the Crop section.
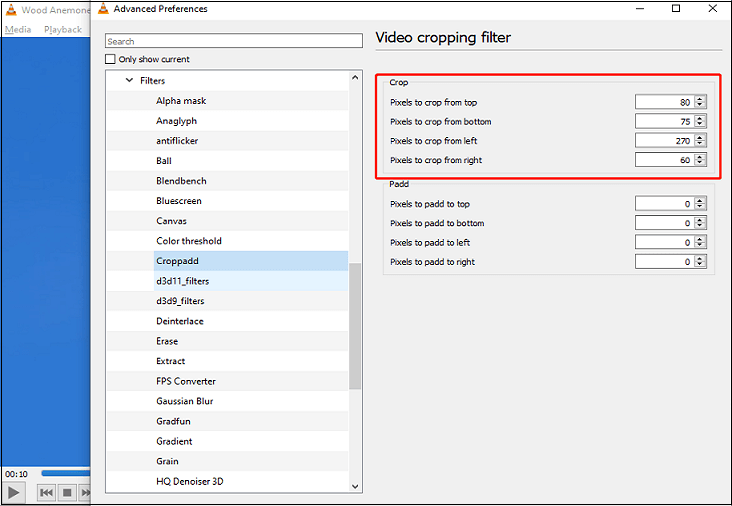
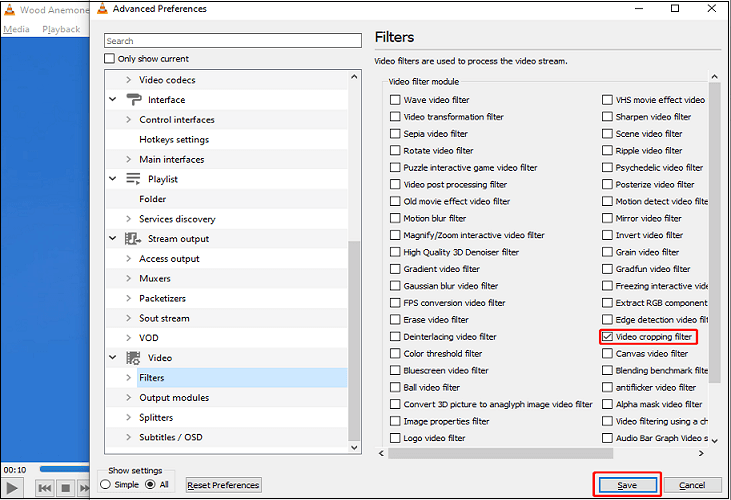
Step 9. Click the Filter submenu, tick the Video cropping filter checkbox, and tap Save to save it.
Step 10. Go to the Media tab and select Convert/Save.
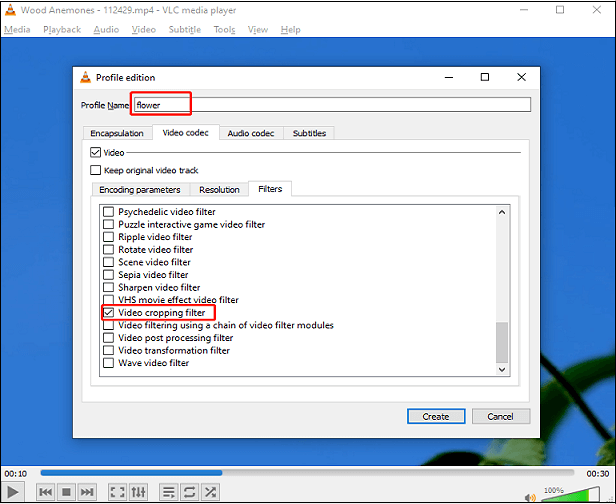
Step 11. Click the spanner-shaped icon, enter the profile name, click Video codec, tick the Video cropping filter, and tap Create.
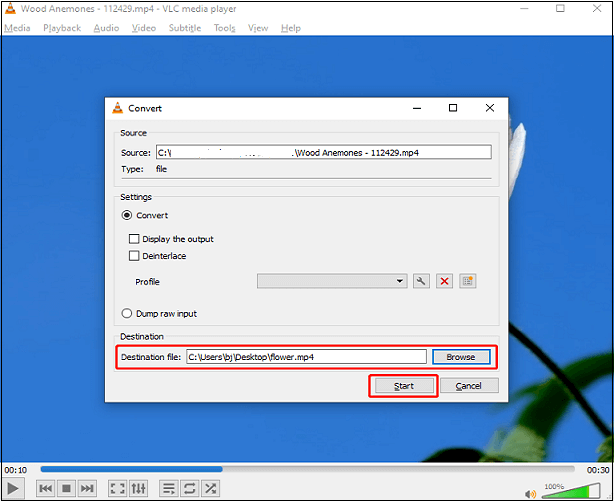
Step 12. In the Destination file, click on Browse to decide where you want it to be saved, and tap Start to save this cropped video.
Also read: How to Trim/Cut a Video in VLC on Windows and Mac.
How to Crop Video in VLC on Mac
If you intend to use the VLC media player on Mac, follow the steps below to crop videos and save them.
Step 1. Open VLC on Mac, go to File, then click on Open File.
Step 2. Tap on Window, select Video Effects from the list, and click Crop.
Step 3. Type the value in pixels from the left, right, top, and bottom to crop out the unnecessary part.
Step 4. Close the crop window, and click on Preferences under the VLC tab.
Step 5. In the pop-up window, click Show All in the lower left corner.
Step 6. Now, go to Video > Filters > Croppadd.
Step 7. Enter the pixel values you entered in step 3 under the Crop section.
Step 8. Click on the Filters submenu, tick the Video cropping filter checkbox, then click Save to save the changes.
Step 9. Follow the last 3 steps of Windows to save this cropped video with VLC.
How to Crop Video in an Easier Way
There is another way to let you crop videos more easily. Have a try on MiniTool MovieMaker, one of the best free video croppers on Windows. Here’s how:
Step 1. Click the Free Download button below to download and install this program on your computer. Then, please open it and close the pop-up window.
MiniTool MovieMakerClick to Download100%Clean & Safe
Step 2. Click on Import Media Files to import your video and drag it to the timeline.
Step 3. Highlight the video on the timeline and click on Crop on the toolbar.
Step 4. Crop the video manually or select one aspect ratio by expanding the Ratio window, then click on OK to confirm.
Step 5. Tap on Export to save this cropped video to your Windows.
Conclusion
VLC media player lets you crop videos, and you just need to follow the guide in this post. However, it might be a little bit complicated to crop video in VLC. Why not try another way by using MiniTool MovieMaker?


User Comments :