When you want your work to be recognized and identified by the audience, or protect your works, you can add a logo to them. And sometimes you may need to add logo to photo? How to add logo to photo free? This post will give you 3 methods. Want to add a text watermark to your video? Try MiniTool MovieMaker.
Before adding logo to photo, you must wonder how to get a logo. Fortunately, there’re many online logo designers and generators that help you create a logo easily, such as Tailor Brands, Canva, Looka, Brandmark, Logo Maker, and more. After your creation, you need to download and save your logo on your computer or other devices.
How to Add Logo to Photo via Image online.co?
Image Online.co offers a variety of tools that enables you to edit your images. It allows you to resize, crop, rotate, flip, sharpen, blur images, add noise to the image, write on image, pixelate images, convert image formats, and many other manipulation tools. And it also lets you add logo to photo for free.

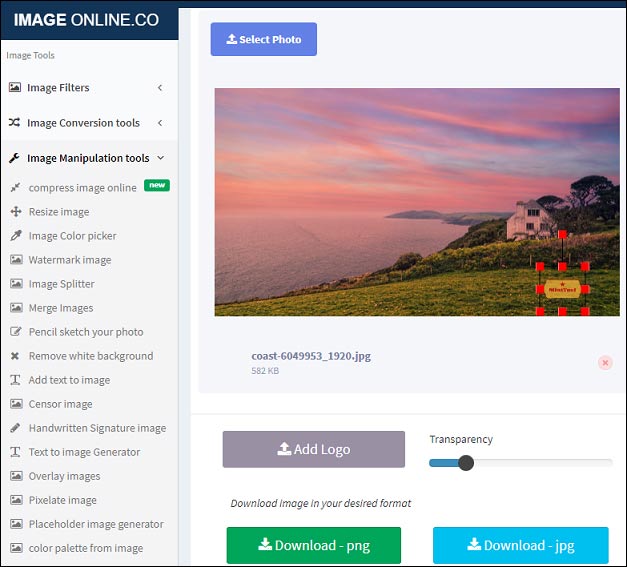
Step 1. Open Image Online.co website, and select the Image Manipulation Tools on the left of the screen.
Step 2. Choose the Add logo to photo option from the dropdown list.
Step 3. Click on Select Photo to browse and open your photo.
Step 4. Tap on Add Logo to upload your logo, and it will automatically display on the picture.
Step 5. Select your logo, you can change its position and size by dragging the mouse.
Step 6. Drag the slider next to Add Logo to adjust the transparency of the logo.
Step 7. Click on Download – png or Download – jpg to save your image.
How to Add Logo to Photo via Watermark.ws?
Watermark.ws also lets you add logo to photo free, and it allows you to add text to the photos, crop images, resize pictures, rotate images, and add filters to photo. Here’s how to add logo to photo with Watermark.ws.

Step 1. Navigate to the Watermark.ws website, then hit the ENTER.
Step 2. Upload your images from your computer or other apps like Facebook, Instagram, OneDrive, Dropbox, etc.
Step 3. Select a photo and press the EDIT SELECTED.
Step 4. On the editing page, select the WATERMARK > LOGO, then click the ADD LOGO to import your logo from your computer or other apps.
Step 5. Change the opacity and location of the logo, then hit the Apply.
Step 6. Click the FINISH to apply the settings, then click the Download to download the photo.
How to Add Logo to Photo via Watermarkly?
If you need to add logo to photo online, Watermarkly is also a good option. Except for adding logo, this site enables you to add text to picture, adjust the image size, and crop images.

Step 1. Navigate to Watermarkly website and tap on RUN WATERMARKLY.
Step 2. Drag and drop your photo to the editing page or click SELECT IMAGES to import images from your computer, Google Drive, Google Photos, and Dropbox.
Step 3. Once the photo is uploaded well, click the NEXT STEP, then tap on ADD LOGO to upload your logo that you want to add.
Step 4. Then adjust the background color, size, opacity of the logo, apply effect, and rotate the logo as you like.
Step 5. Tap on WATERMARK IMAGES, choose the image quality, or resize images with available options, then click the WATERMARK IMAGES to add the logo to the picture.
Step 6. Hit the DOWNLOAD ALL to download and save the image.
Conclusion
With the 3 ways, you can add logo to photo online quickly and easily. Now, choose one method and try add logo to your pictures.


User Comments :