Transitions play a crucial role in video editing. They can make your video flow smoothly. This post from the best video editor, MiniTool MovieMaker, focuses on spin transitions. It shows you how to easily add spin transitions to video clips.
What Is Spin Transition in Video Editing
A spin transition is a special effect used to switch between two video clips smoothly. It makes the first clip spin out of view before moving to the next scene. This can make the video look more exciting or artistic. It’s often used in action scenes, music videos, and so on.
Some video editors, like Clipchamp, have spin transition templates built in, so it’s easy to add a spin transition to your video clips. But if your video editor doesn’t have this, you can create a spin transition by using motion effects like rotation, scaling, and keyframes.
How to Add a Spin Transition in Clipchamp
Clipchamp is an easy-to-use video editor that offers spin transition templates. With it, you can easily and quickly add a spin transition between your video clips.
Step 1. Launch Clipchamp on your Windows 11 PC. If you use Windows 10, you need to download and install this software first.
Step 2. Click Import Media Files to load your videos. You can also drag and drop them into the program. Click the + icon to add them to the timeline.
Step 3. Go to the Transitions tab on the left toolbar, go to the Zooms & spins section, and drop the spin transitions you like between two clips on the timeline.
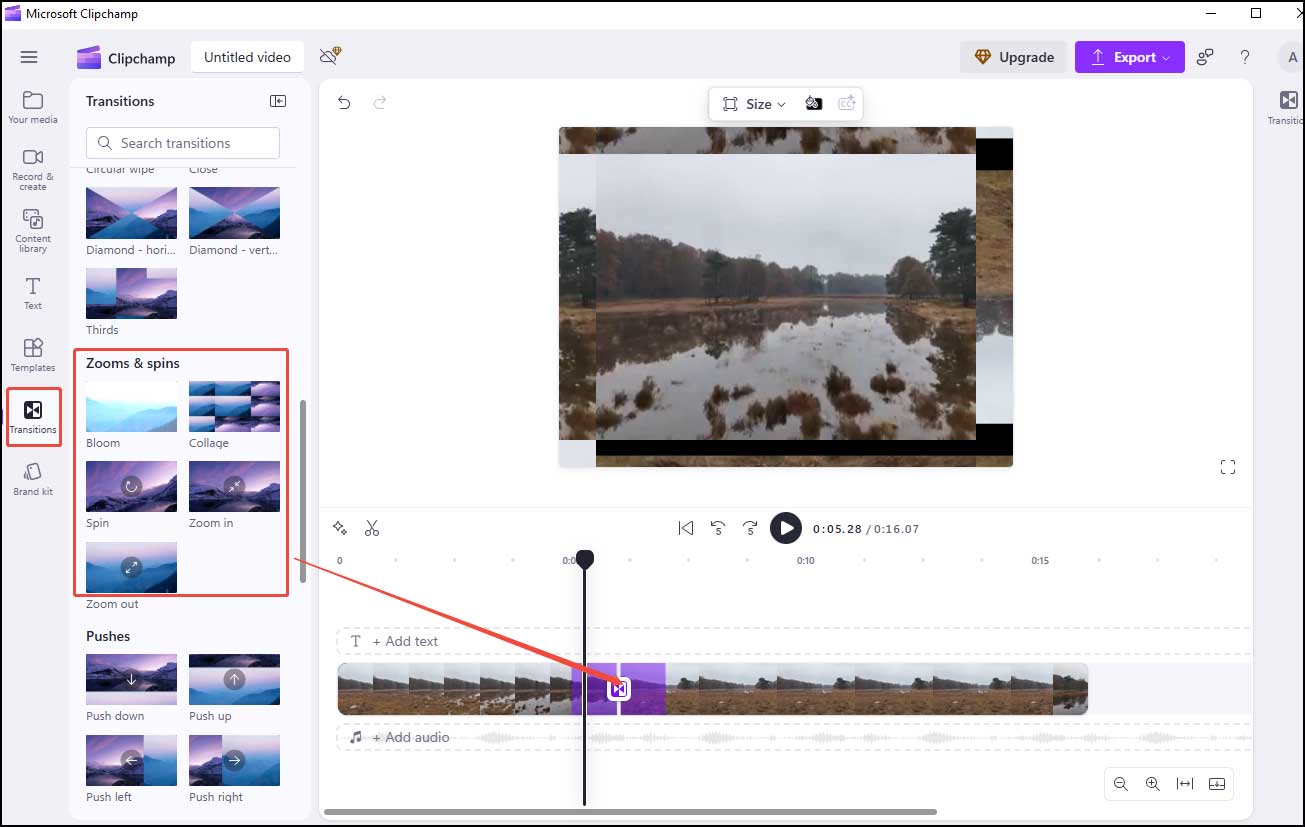
Step 4. Preview the video by clicking on the play button. Click the Export button and choose the video resolution you need from the list. Then click the Save to your computer button to export it to your PC.
![How to Crop a Teams Recording Easily [Desktop and Online]](https://images.minitool.com/moviemaker.minitool.com/images/uploads/2025/07/how-to-crop-a-teams-recording-thumbnail.jpg)
How to Add a Spin Transition in Premiere Pro
Premiere Pro is a professional and powerful video editor, but it doesn’t have built-in spin transition presets. You can follow the steps below to achieve the spinning effect with me.
Step 1. Download, install, and open Premiere Pro.
Step 2. Go to File and click Import to add your video clips into Premiere Pro. Then, drag and drop the first video onto Video Track 1 and the second video clip after it.
Step 3. Go to the Project Panel, select New Item > Adjustment Layer, and click OK. Drag the adjustment layer to Video Track 2 above the first clip.
Step 4. Adjust the adjustment layer duration to overlap the clips by 10 frames
Step 5. Right-click the adjustment layer and select Duplicate. Place the duplicated adjustment layer on Video Track 3.
Step 6. Go to the Effects Panel and search for the Replicate effect. Drag and drop the effect on Video Track 2.
Step 7. Search for the Mirror effect in the Effects Panel and drag the effect onto the adjustment layer with the Replicate effect. Go to the Effect Controls Panel and set the Reflection Angle to 90.
Step 8. Search for the Transform effect in the Effects Panel and drag it to the duplicated layer on Video Track 3. In the Effect Controls Panel, set the Rotation to 180° and Scale to 200% at the start, and 0° and 100% at the end.
Step 9. Go to the Transform effect settings, uncheck Use Composition’s Shutter Angle, and set Shutter Angle to 360°.
Step 10. Before exporting, you can preview the transition and ensure it’s smooth. When satisfied, click Export.
MiniTool MovieMakerClick to Download100%Clean & Safe

Conclusion
Spin transitions make your videos more eye-catching. This post offers 2 video editors to help you add a spin transition effect to your video. I hope you enjoy it.
User Comments :