Almost no one denies that Photoshop is an excellent application for creating composite images. However, before you can start blending images into digital artwork, you have to put them into the same document. This post from MiniTool MovieMaker will give you a quick description of the three ways to learn how to insert an image in Photoshop.
MiniTool MovieMakerClick to Download100%Clean & Safe
Way 1: Copy and Paste Shortcuts
This is the first method on how to insert an image into layer in Photoshop, and you can use the keyboard shortcuts to do it completely. Also, it’s so easy this way that it can boost your productivity. In particular, if you are already used to using the standard copy and paste shortcuts found in all applications and operating systems.
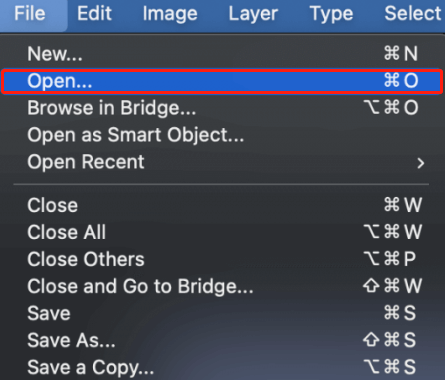
First of all, click Open from the File menu. Browse to find the image you would like to insert, then click OK. Or, you can use the Command + O (on a Mac) or Ctrl + O (on a PC) keyboard shortcuts. Photoshop will automatically create a new document tab for your image and automatically switch to it.

To select all the pixels in an image, press the standard “Select All” keyboard shortcut – Command + A (on a Mac) or Ctrl + A (on a PC). You will see a selection marquee come up around the edges of the document window, which indicates that you have selected all the pixels in the image.
After that, use the Command + C (on a Mac) or Ctrl + C (on a PC) keyboard shortcut to copy the selection to your computer’s temporary clipboard. Then, go back to the main Photoshop document and press the standard keyboard shortcut Command + V (on a Mac) or Ctrl + V (on a PC) to paste the contents of the clipboard into the main document.
Photoshop should create a new layer automatically and fill it with the pixel data you previously copied. At this time, you can begin applying a mask to hide the backdrop or make any other changes necessary to complete your project.
Also read: Photoshop Desktop Shortcut | Photoshop Keyboard Shortcuts
Way 2: Duplicate Layer
In addition to using the keyboard shortcuts and the temporary clipboard, there is another method that can help you learn how to insert an image in Photoshop.
Select Open from the File menu. Locate the image you want to insert and click OK. The Photoshop application will open a new document tab for the image and switch to it automatically.
Find the Layers panel in the lower left corner of the interface. A standard image should have only one layer, which is automatically labeled as Background, or in some situations, with the image filename.
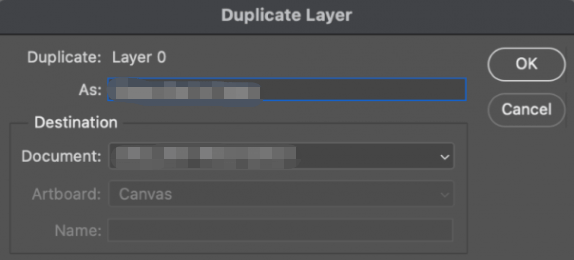
In the Layers panel, right-click the layer entry and select Duplicate Layer. As expected, Photoshop will open the Duplicate Layer dialog box, which provides many options for dealing with your duplicated layer.

In the As: field, type a descriptive name. And, select the document you wish to insert this image into from the Document dropdown menu.
If you haven’t yet created your target document, you can click New and let Photoshop create a new document automatically with the same dimensions.
Way 3: Linking and Embedding Images
The third method on how to insert images in Photoshop focus on placing external files into the Photoshop document as Smart Objects through two different but related approaches, called Linking and Embedding. They appear to be very similar at first, however, there is a significant difference between them, so let’s take a deeper look at how everything works.
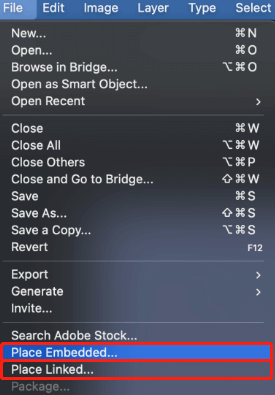
Open the File menu and look for the Place Embedded and Place Linked options.

The Place Linked option lets you insert an image into the Photoshop document, yet the image you notice is actually a placeholder thumbnail for the original file. Therefore, you cannot make changes to the linked file from within your main Photoshop document; instead, you will need to open the original file. When you edit that original file, you can refresh the link to update the placeholder thumbnail in the main document.
The Place Embedded option enables you to embed another image into the current Photoshop document. The Photoshop program creates a new Smart Object including the image you would like to insert, which is visible in your main document.
In contrast to a Linked file, you can make changes to the embedded smart object with any of the standard Photoshop commands that apply to smart objects, but any changes you make to the original file will not be applied.
Conclusion
In short, this post describes how to insert an image in Photoshop using the copy and paste shortcuts, the Duplicate Layer, as well as linking and embedding images.


User Comments :